Segment Reporting - User Guide
A complete walkthrough of the Segment Reporting plugin for Emby Server. This guide covers installation, navigation, editing, bulk operations, custom queries, and settings - everything you need to manage intro and credits markers across your media libraries.
Getting Started
What This Plugin Does
Segment Reporting gives you visibility and control over the intro and credits markers in your Emby libraries. These markers are the timestamps that power Emby's "Skip Intro" and "Skip Credits" buttons during playback.
The plugin tracks three marker types - Intro Start, Intro End, and Credits Start - which are the marker types that Emby currently supports. Other segment types such as recaps, previews, commercials, and mid/post-credit scenes are not supported by Emby's chapter system and cannot be tracked here.
The plugin builds a local index of all your segment data so you can:
- See which episodes and movies have markers - and which are missing them
- Edit timestamps directly from a table view
- Bulk-manage markers across entire seasons or series
- Query your segment data with a visual query builder or raw SQL
- Export results to CSV for offline analysis
All changes you make through the plugin are saved back to Emby immediately. The plugin's local index is just a fast cache - Emby always has the real data.
Installation
- Download the latest
segment_reporting.dllfrom the GitHub Releases page. - Copy the DLL into your Emby Server plugins directory:
- Windows:
C:\ProgramData\Emby-Server\plugins - Linux:
/opt/emby-server/plugins(may vary by installation) - Restart Emby Server.
- Go to Settings > Plugins and confirm "Segment Reporting" appears in the list.
Tip: You do not need to configure anything in the Plugins page itself. The plugin is ready to use once it appears in the list.
Running the First Sync
Before the plugin can show any data, it needs to scan your libraries and build its index. This happens automatically every night, but you should run it manually the first time:
- Go to Settings > Scheduled Tasks in Emby.
- Find the Segment Reporting category.
- Click Run next to "Sync Segment Data."
- Wait for the task to complete. For a small library this takes a few seconds; for very large libraries (50,000+ items) it may take a few minutes.
Once the sync finishes, the plugin dashboard will show your segment data.
Finding the Plugin
After installation and the first sync, you can access the plugin from Emby's sidebar menu. Look for Segment Reporting under the server administration section (it uses a chart icon).
Clicking it opens the Dashboard - the main entry point for all plugin features.
Dashboard
The Dashboard gives you a high-level overview of segment coverage across all your libraries.
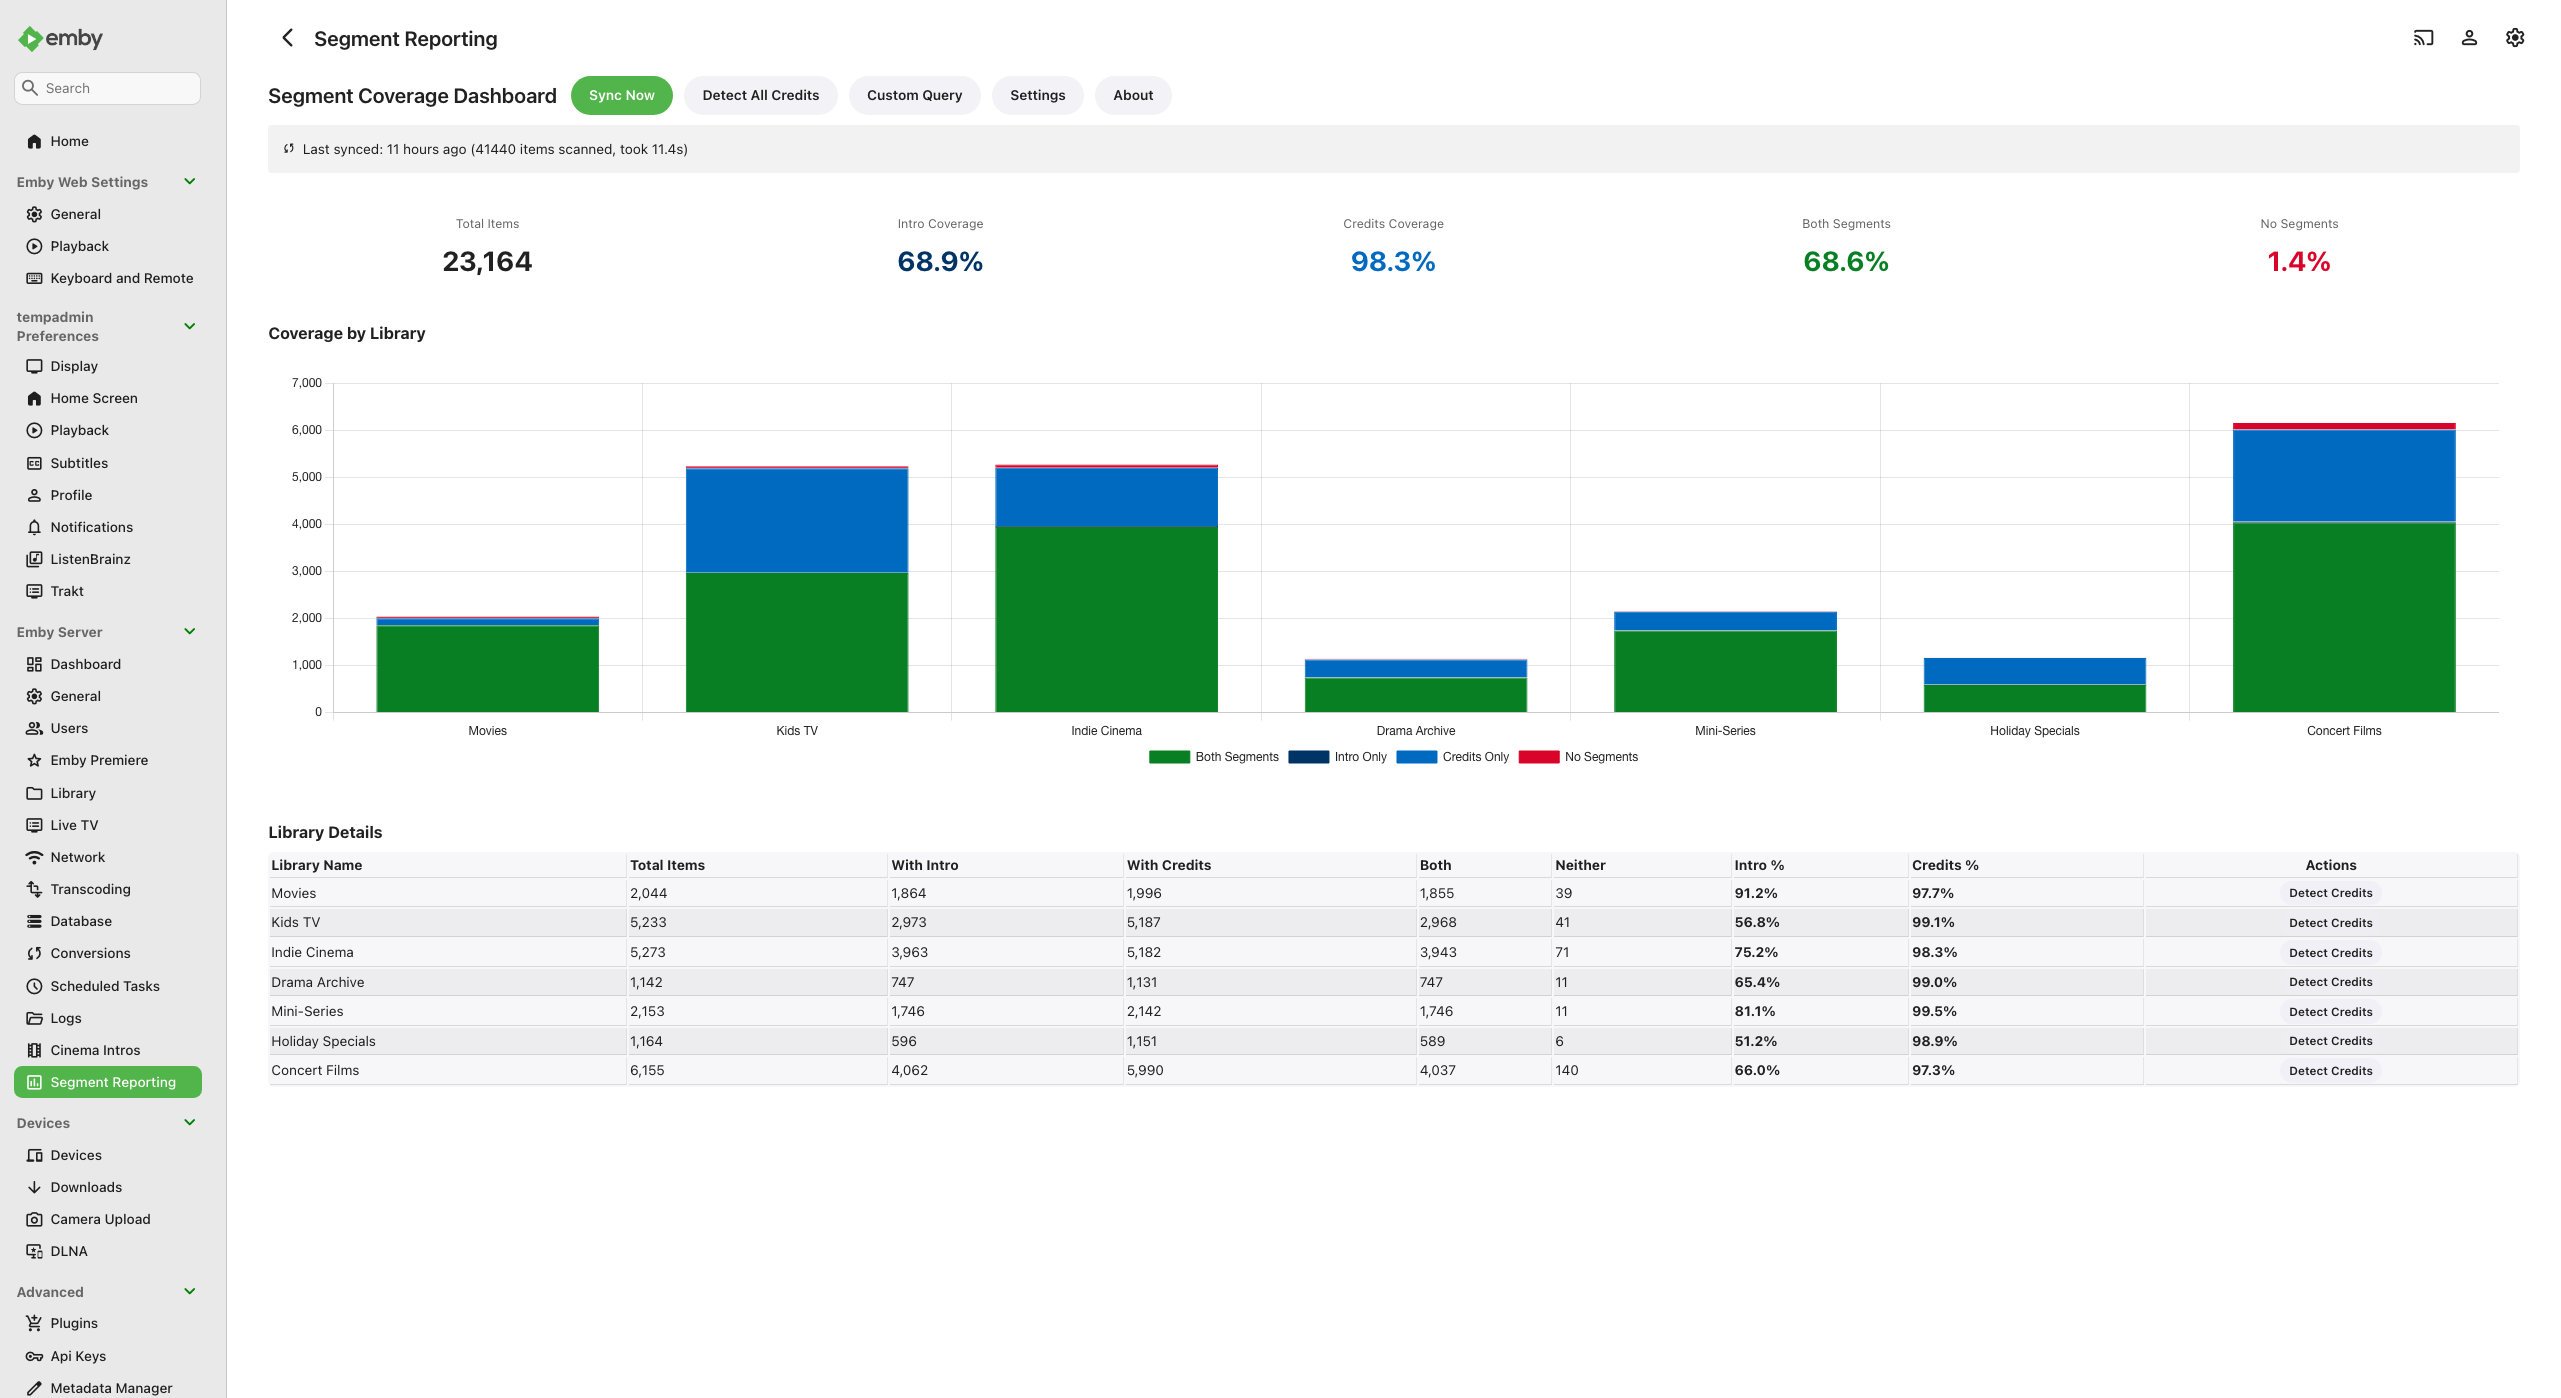
The Dashboard showing summary cards, a stacked bar chart of coverage by library, and a detailed breakdown table.
Summary Cards
At the top of the page, four cards show totals across all your libraries:
| Card | What It Shows |
|---|---|
| Total Items | The number of episodes and movies in the index |
| With Intros | How many items have at least one intro marker |
| With Credits | How many items have a credits marker |
| With Both | How many items have both intro and credits markers |
These numbers update whenever you return to the Dashboard.
Coverage Chart
Below the summary cards is a stacked bar chart with one bar per library. Each bar shows four categories:
- Both Segments - items with intro and credits markers
- Intro Only - items with an intro marker but no credits
- Credits Only - items with a credits marker but no intro
- No Segments - items with neither marker
Click any bar in the chart to navigate directly into that library.
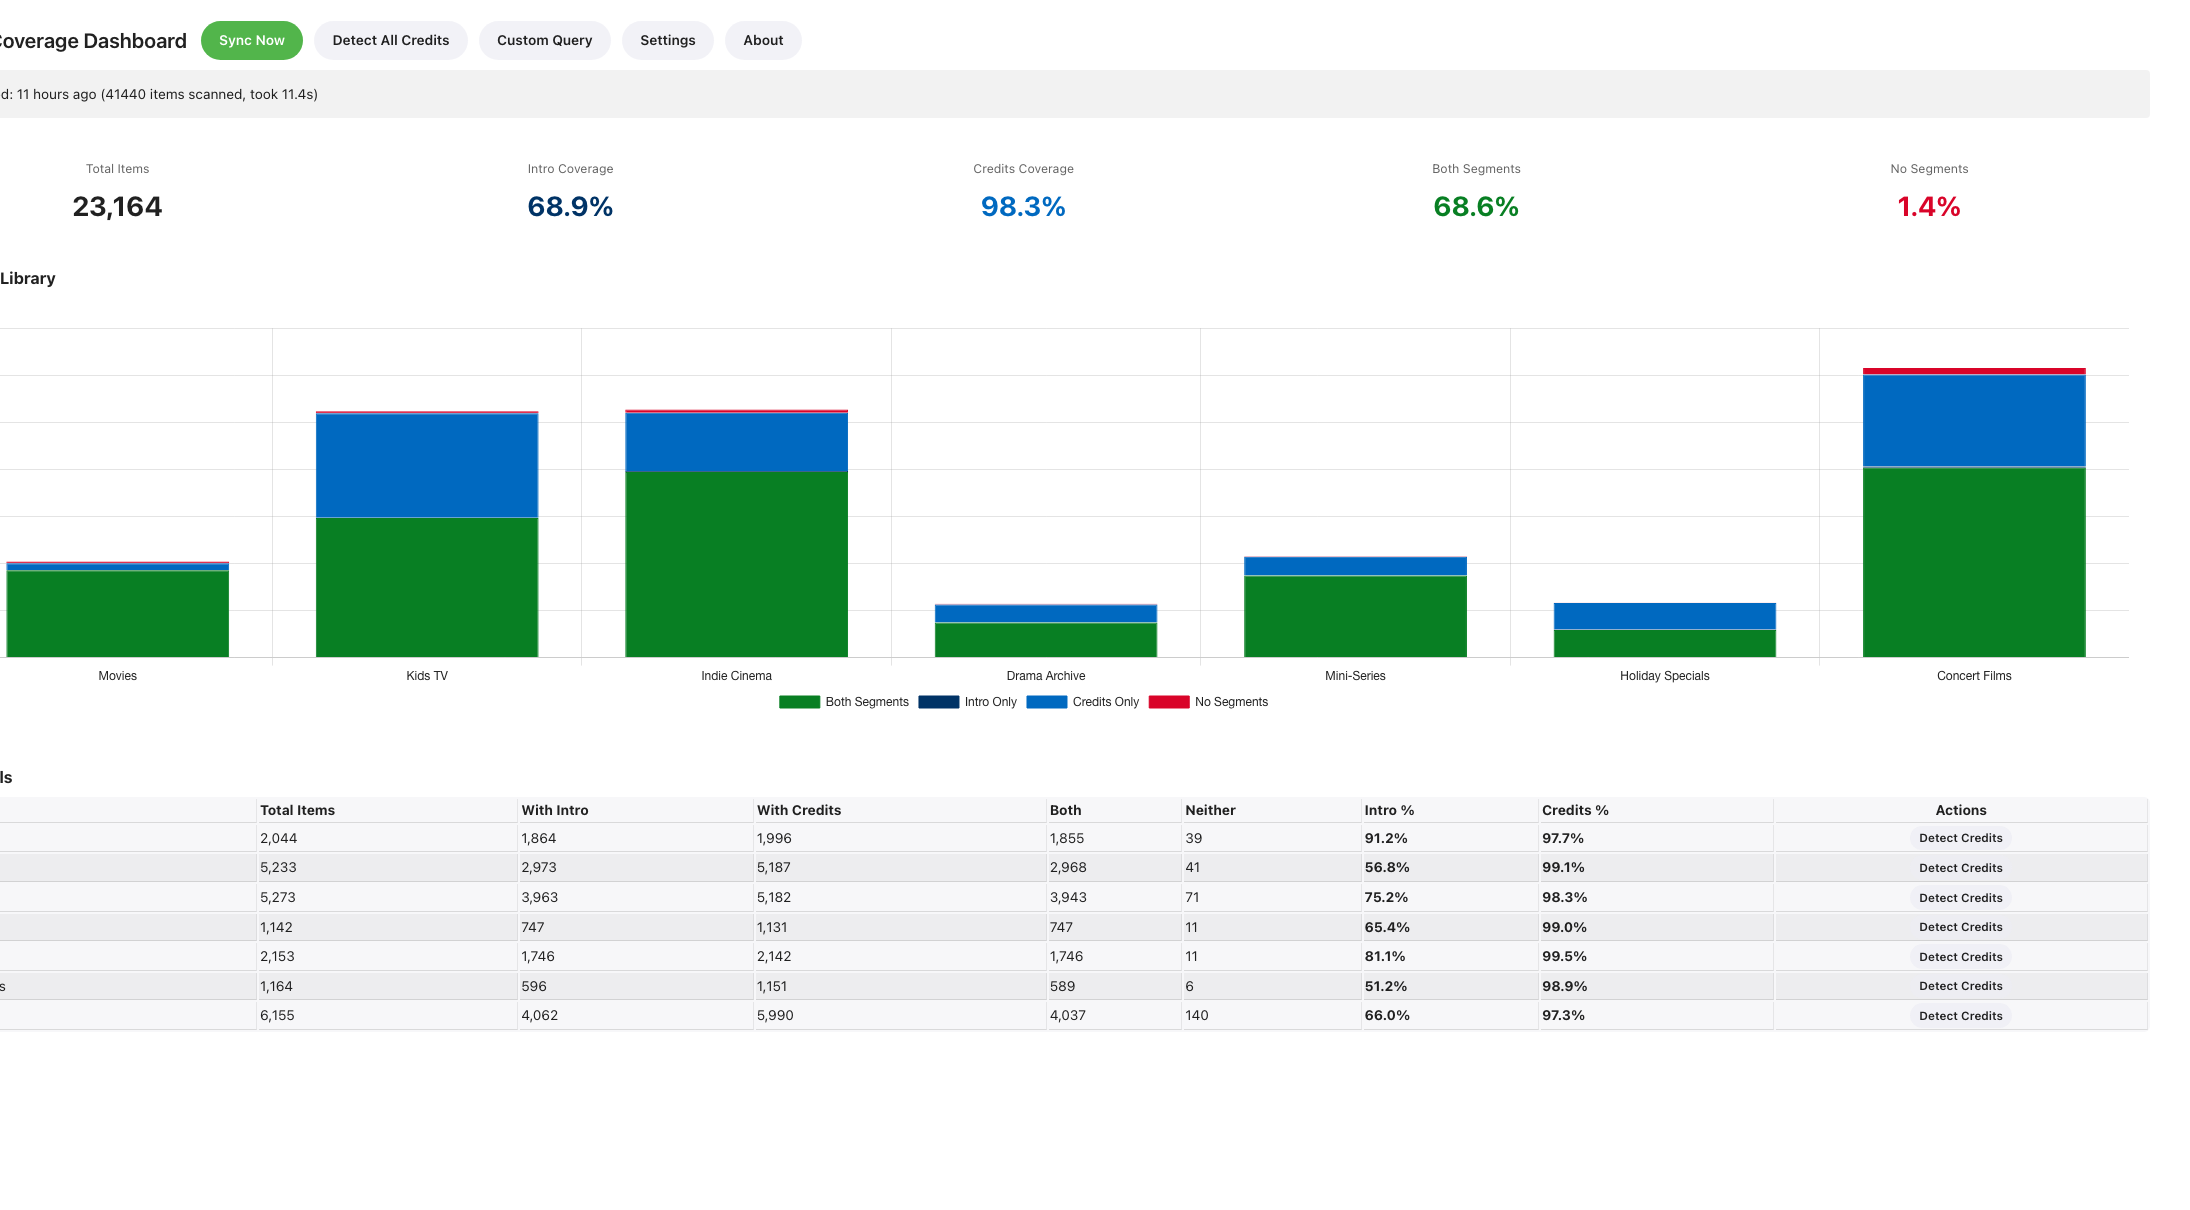
The coverage chart and library details table (sidebar cropped out).
Library Table
Below the chart is a table listing each library with columns for total items, intro count, credits count, both count, no-segments count, Intro %, and Credits %. The two percentage columns show how much of each library has intro and credits markers, respectively. Hover over a row to highlight it, and click anywhere on the row to drill into that library.
If the EmbyCredits plugin is installed, each row also has a Detect Credits button that finds all items missing credits in that library and queues detection for them.
Sync Status and Actions
At the bottom of the Dashboard you will find:
- Last synced - a relative timestamp (e.g., "3 hours ago") showing when the index was last updated
- Sync Now - triggers an immediate sync without waiting for the nightly schedule
- Detect All Credits - only visible if the EmbyCredits plugin is installed. Queues credits detection for everything in your library
The navigation bar also has buttons to jump to Custom Query, Settings, and About.
Library Browsing
Navigating to a Library
Click any library name or chart bar on the Dashboard to open the library view. A breadcrumb trail at the top (e.g., Dashboard > TV Shows) lets you navigate back at any time.
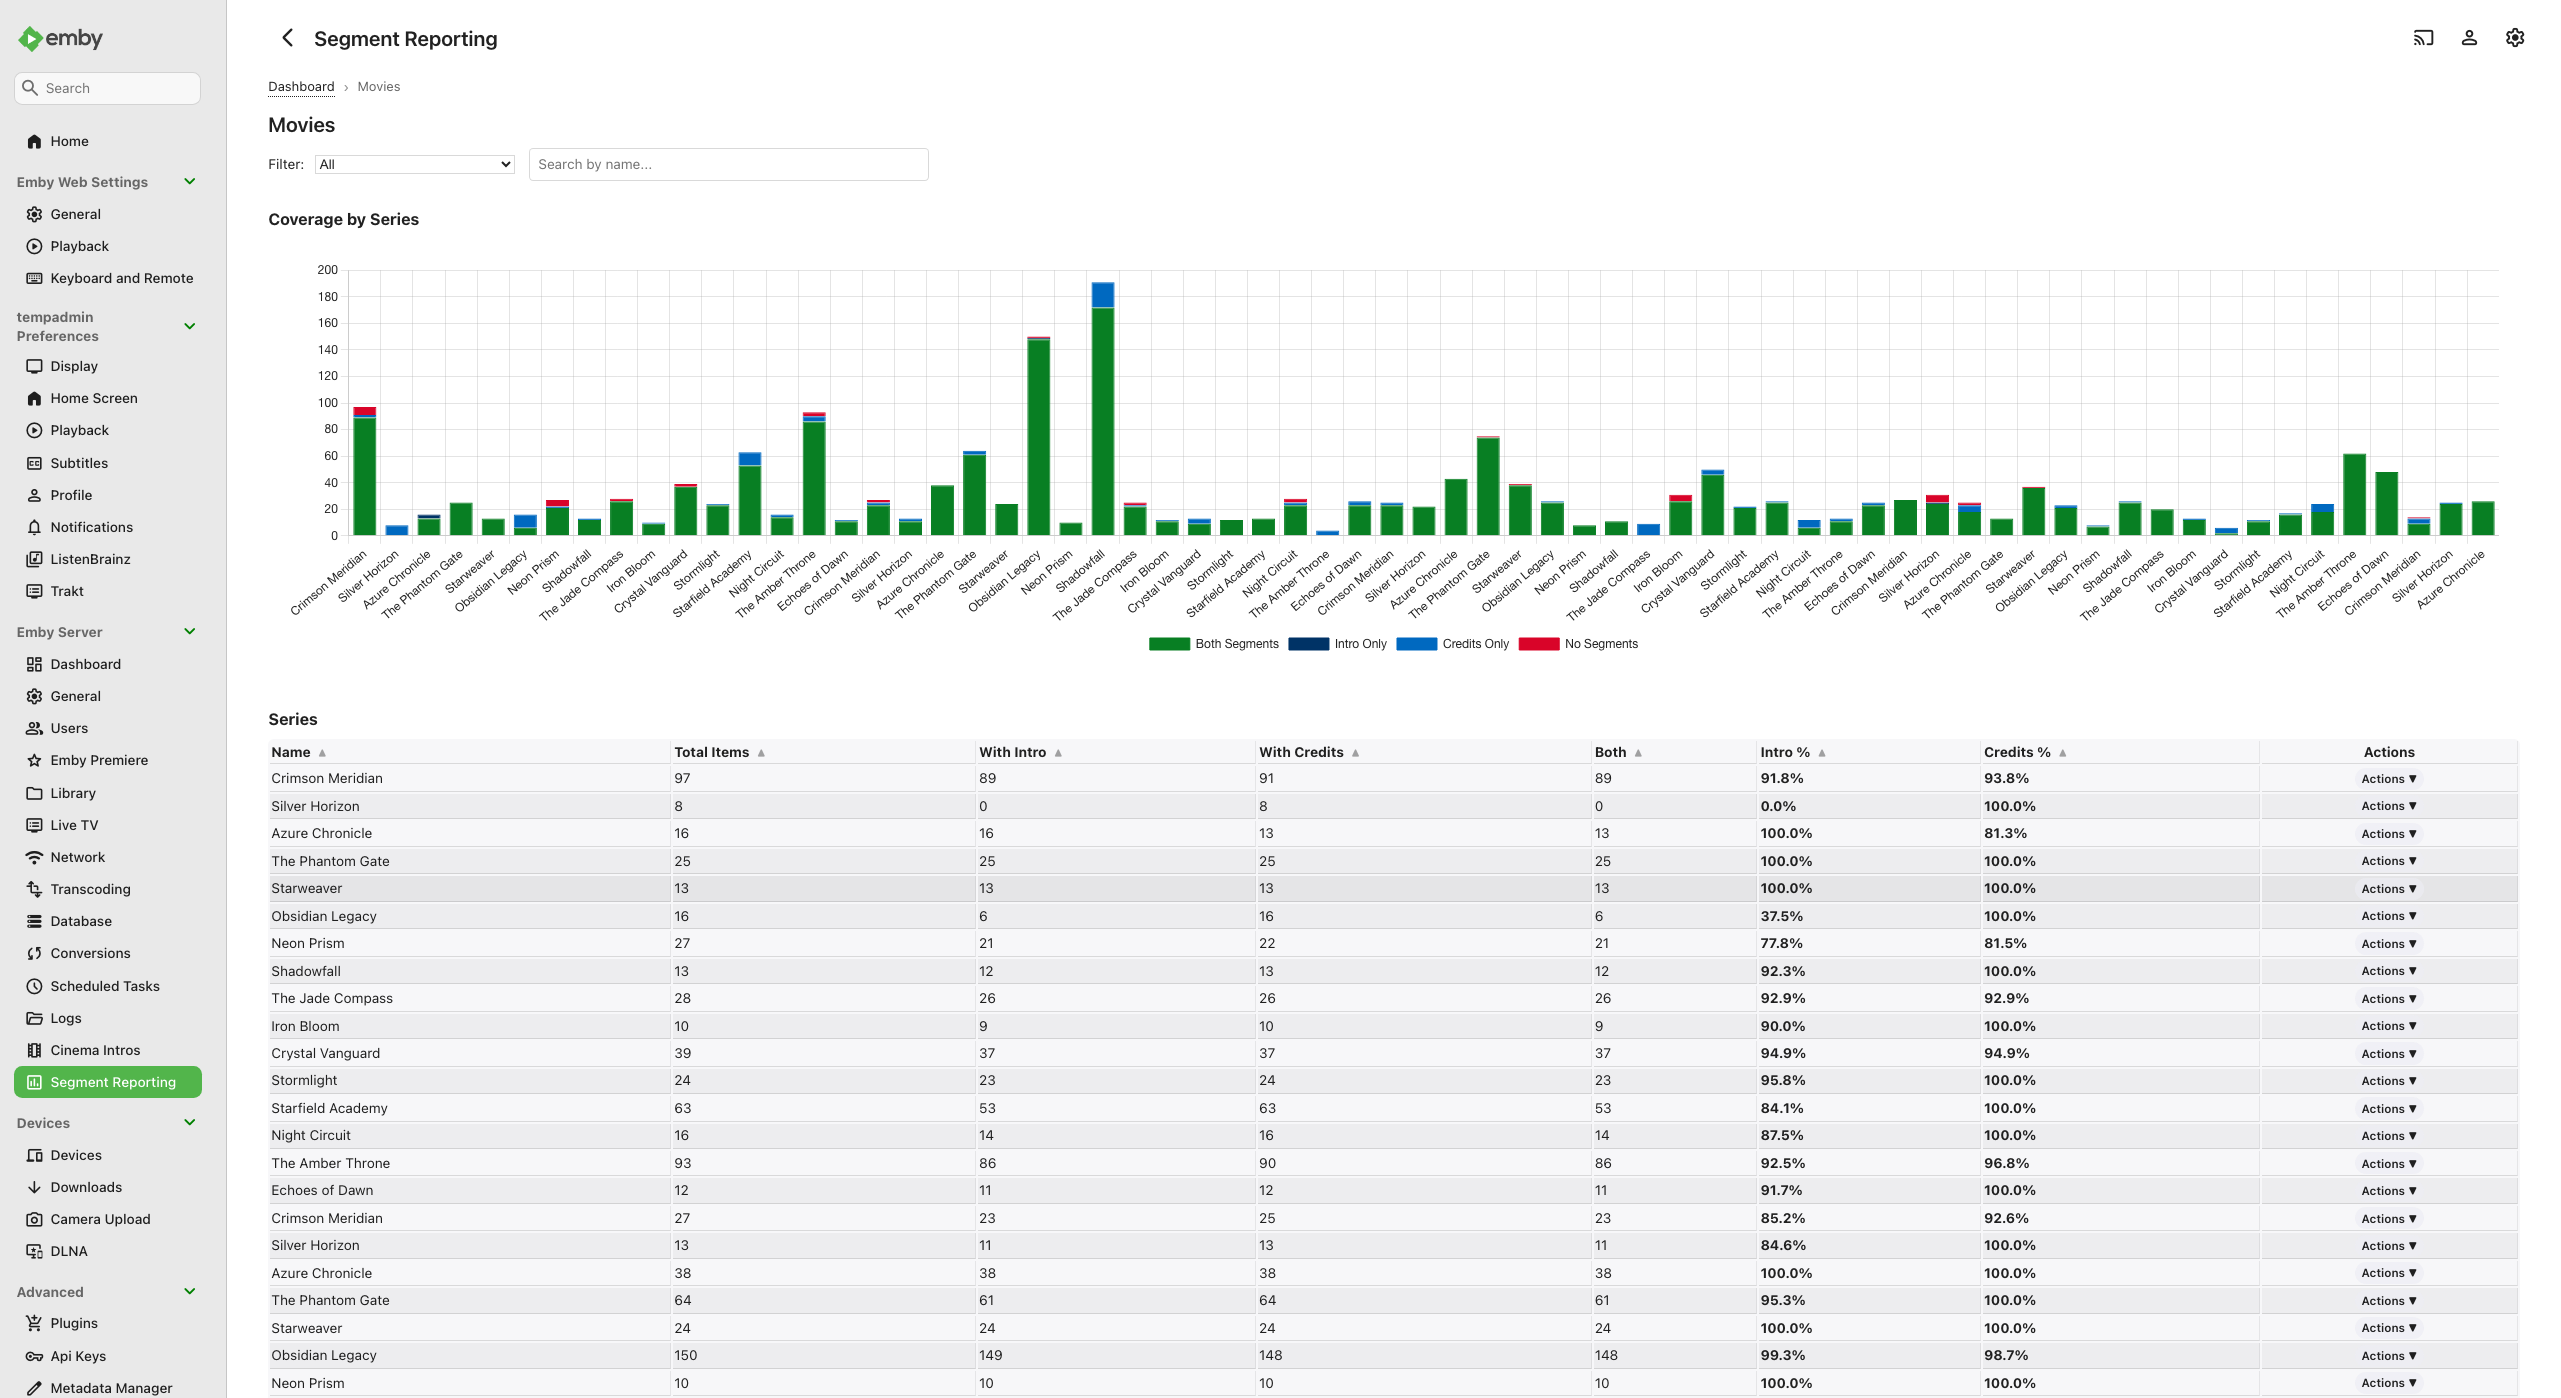
A TV Shows library with a series-level coverage chart, filter/search controls, and a sortable series table.
Filtering and Searching
Two controls at the top help you narrow down results:
Filter dropdown with seven options:
| Filter | Shows |
|---|---|
| All | Everything in the library |
| Complete (Both Segments) | Series/movies with all markers present |
| Missing Intros | Series/movies without intro markers |
| Missing Credits | Series/movies without credits markers |
| Has Intro | Series/movies that have at least one intro marker |
| Has Credits | Series/movies that have at least one credits marker |
| No Segments | Series/movies with no markers at all |
Search box - type part of a series or movie name to filter the list instantly. The search updates as you type (with a short delay to avoid flickering).
Series Libraries
For libraries containing TV shows, you will see:
- A stacked bar chart showing coverage per series
- A series table with columns for series name, total episodes, intros, credits, coverage percentages, and an Actions column
Click a series name or chart bar to drill into the Series Detail view.
Column headers in the table are sortable - click any header to sort by that column. Click again to reverse the order.
Each series row has an Actions dropdown with the following operations:
- Delete - submenu with Intros, Credits, or Both to remove markers from all episodes in the series. Greyed out when the series has no markers of that type.
- Set Credits to End - places the Credits Start marker at each episode's runtime endpoint across the entire series.
- Detect All - queues credits detection for all episodes in the series, overwriting any existing markers. Only visible when EmbyCredits is installed.
- Detect Missing - queues credits detection only for episodes that don't have credits yet. Greyed out when all episodes already have credits. Only visible when EmbyCredits is installed.
Movie Libraries
For movie-only libraries, the view shows a flat table of movies with their segment timestamps displayed directly. Each movie row has an Actions dropdown with the following operations:
- Edit - opens inline editing for the movie's timestamps
- Adjust timing - opens the timing adjustment modal (see Adjusting Timing) to nudge the movie's markers in 250 ms steps
- Delete - submenu with Intros, Credits, or Both to remove markers. Greyed out when the movie has no markers of that type.
- Set Credits to End - places the Credits Start marker at the movie's runtime endpoint.
- Detect Credits - queues credits detection for the movie. Only visible when EmbyCredits is installed.
Mixed Libraries
Libraries that contain both TV shows and movies display two separate sections - a series table and a movie table - so you can work with each type independently. Both sections include the full Actions dropdown described above.
Series Detail
Click a series name from the library view to see its full season and episode breakdown.
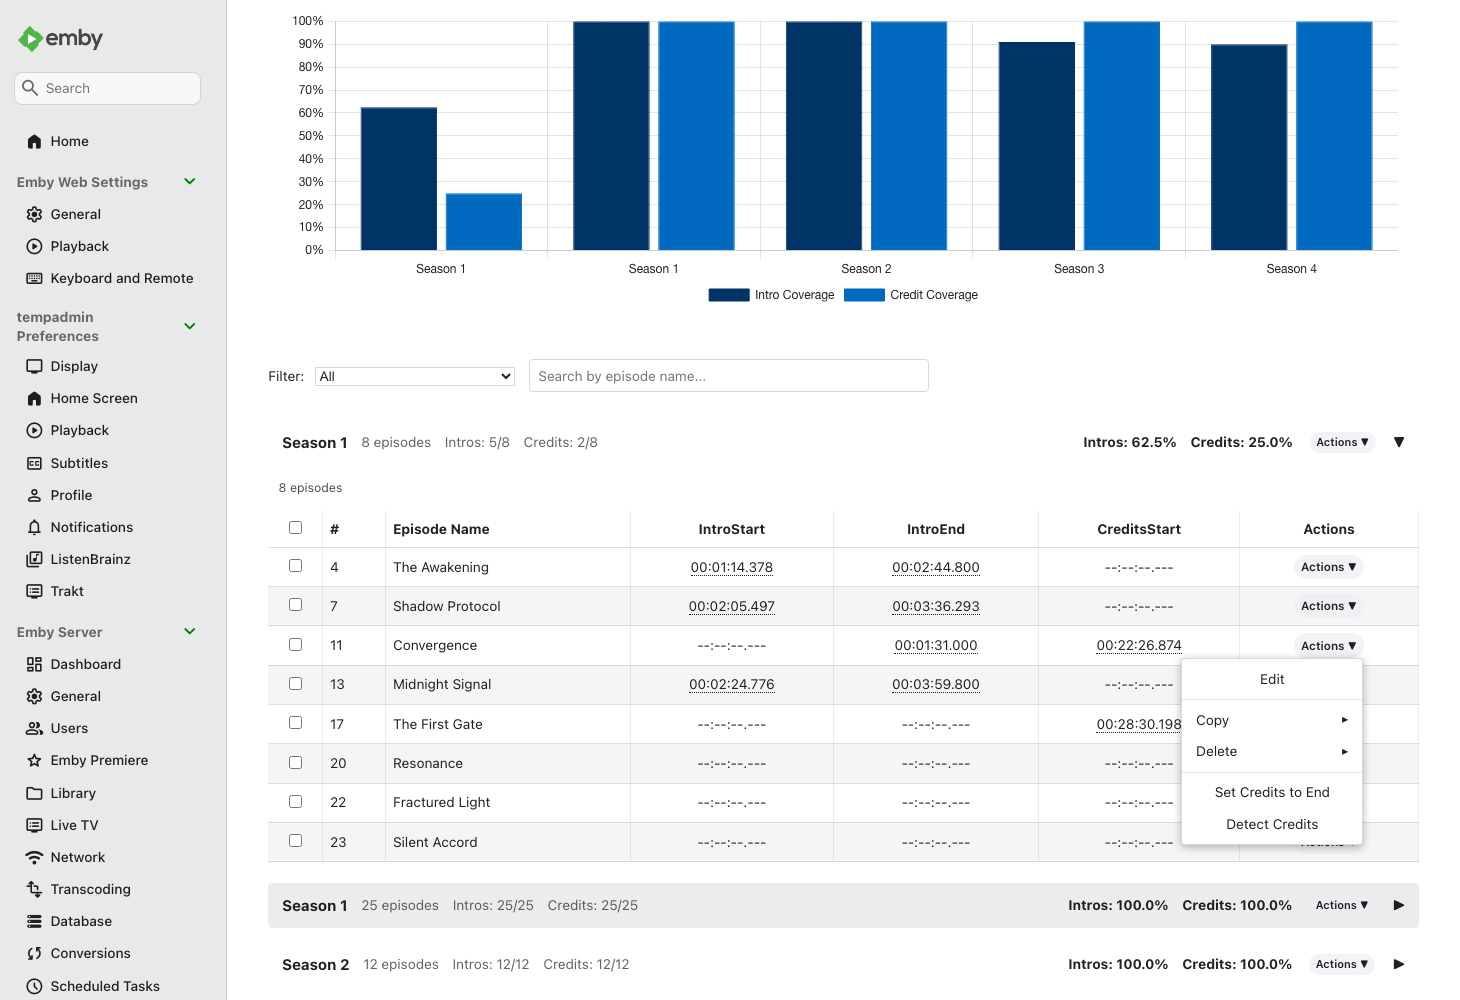
A series detail page showing a per-season coverage chart, season accordions with episode tables, and the "Missing Credits" filter applied.
Season Chart
At the top is a bar chart showing intro and credits coverage percentages for each season. This gives you a quick visual overview of which seasons need attention.
Season Accordions
Below the chart, each season appears as a collapsible section. The first season expands automatically. Click any season header to expand or collapse it.
Each season header shows coverage stats (e.g., "12/13 intros, 10/13 credits") so you can spot incomplete seasons at a glance.
Episode Table
Inside each season accordion is a table listing every episode with columns for:
| Column | Description |
|---|---|
| Checkbox | Select episodes for bulk operations |
| # | Episode number |
| Episode Name | Title of the episode |
| Intro Start | Timestamp where the intro begins |
| Intro End | Timestamp where the intro ends |
| Credits Start | Timestamp where the credits begin |
| Actions | An Actions dropdown menu for editing, adjusting timing, deleting, copying, and more |
Timestamp values appear as clickable links (see Playback Links below). A dash
(--:--:--.---) means no marker is set.
Playback Links
Every timestamp in the episode table is a clickable link. Clicking it launches playback of that episode starting at exactly that timestamp position in Emby's built-in player. This is useful for verifying that a marker is at the correct position - click the Intro Start timestamp and you should see the beginning of the intro sequence.
Editing Segments
Inline Editing
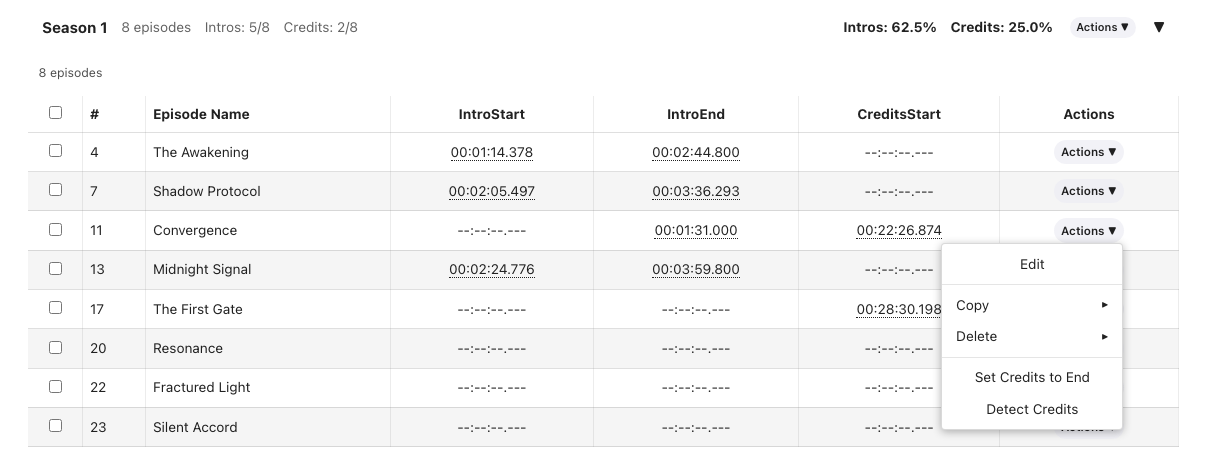
The Actions dropdown on an episode row: Edit, Copy, Delete, and Set Credits to End.
To edit an episode's segment timestamps:
- Click the Actions button in the episode row to open the dropdown menu.
- Select Edit.
- The timestamp cells turn into text input fields pre-filled with the current
values. Empty markers show
00:00:00.000as a placeholder. - Type the new timestamp(s).
- Click Save to apply, or Cancel to discard.

An episode row in edit mode: each timestamp cell becomes a text input field, with Save and Cancel buttons in the Actions column.
When you save, the plugin writes the change directly to Emby's chapter system. The edit takes effect immediately - if you play the episode, Emby will use the new timestamp for its "Skip Intro" or "Skip Credits" button.
Tip: You can edit timestamps on the Library page (for movies), the Series Detail page (for episodes), and even in Custom Query results.
Timestamp Format
All timestamps use the format HH:MM:SS.fff:
| Part | Meaning | Example |
|---|---|---|
HH |
Hours | 00 |
MM |
Minutes | 01 |
SS |
Seconds | 23 |
fff |
Milliseconds | 500 |
Examples:
00:01:23.500- 1 minute and 23.5 seconds in00:00:45.000- 45 seconds in01:05:30.250- 1 hour, 5 minutes, 30.25 seconds in
If you enter an invalid format, the plugin will show an error and will not save.
Deleting a Segment
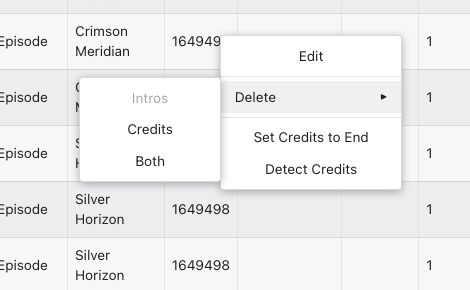
The Delete submenu: remove Intros, Credits, or Both from an item.
To remove markers from an episode:
- Click the Actions button on the episode row.
- Hover over Delete to open the submenu.
- Choose what to remove:
- Intros - removes Intro Start and Intro End markers
- Credits - removes the Credits Start marker
- Both - removes all markers from the episode
- Confirm the deletion when prompted.
This is useful when a marker was detected incorrectly and you want to clear it rather than edit it to a new value.
Setting Credits to End
The Set Credits to End option in the Actions menu sets the Credits Start marker to the very end of the episode's runtime. This is primarily intended for episodes that have no end credits at all - by placing the marker at the end, you signal that the item has been accounted for. This prevents the EmbyCredits plugin from needlessly scanning these items for credits that do not exist.
Tip: To apply this across many episodes at once, use the season-level Actions dropdown - see Season-Level Actions Dropdown.
Adjusting Timing (Per Row)
The Adjust timing option in the Actions menu lets you nudge an item's markers earlier or later in 250 ms steps without opening the full inline editor.
- Click the Actions button on the episode or movie row.
- Select Adjust timing.
- A modal appears with up to three rows:
- Intro - moves IntroStart and IntroEnd together, preserving the intro length. Use this when the intro starts too early or too late. This row is only available when both the intro start and intro end markers are present; if only one exists, this row is disabled - use the inline editor or the Intro end row instead.
- Intro end - moves only IntroEnd, leaving IntroStart unchanged. Use this to trim or extend the intro's end point.
- Credits - moves CreditsStart earlier or later.
- For each row, click the left arrow to move that marker earlier or the right arrow to move it later (each click = 250 ms). You can also adjust a row from the keyboard - see Keyboard Shortcuts below.
- Click Apply to save the change.
A brief Undo prompt appears after applying. Click it immediately to restore the previous values if the adjustment was wrong. The Undo control is keyboard focusable, so you can reach it with Tab and activate it with Enter or Space.
Notes:
- Markers that do not exist on the item are shown disabled and cannot be adjusted.
- The left (earlier) arrow is disabled when the marker is already at 0 to prevent negative timestamps.
- This is available on the Series Detail page (episode rows), the Library page (movie rows), and the Custom Query results table.
Keyboard Shortcuts
Several controls can be operated entirely from the keyboard, which is useful for fast adjustments and required for screen-reader and keyboard-only access.
Timing Adjustment Dialog
When the Adjust timing dialog is open (per-row or bulk), each marker value is a focusable control. Tab moves between them and the dialog buttons; focus stays inside the dialog until you close it.
| Key | Action |
|---|---|
| Tab / Shift+Tab | Move between the marker rows and the Cancel / Apply buttons |
| Up arrow or Right arrow | Move the focused marker later by 250 ms |
| Down arrow or Left arrow | Move the focused marker earlier by 250 ms |
| Shift + arrow | Larger 1-second step in the same direction |
| Page Up / Page Down | 5-second step (later / earlier) |
| Enter | Apply the changes |
| Escape | Cancel and close the dialog without saving |
When the dialog closes, focus returns to the control you opened it from.
Inline Editor Keyboard Controls
While editing a row's time fields in the inline editor:
| Key | Action |
|---|---|
| Enter | Save the row |
| Escape | Cancel editing and discard the changes |
| Left / Right arrow | Move the text cursor within the time field (normal typing behavior) |
Tables and Lists
- Sortable column headers (Series and Movie tables): press Tab to focus a header, then Enter or Space to sort by that column.
- Snackbar Undo: after applying a timing change, press Tab to reach the Undo control in the prompt, then Enter or Space to undo.
Bulk Operations
Bulk operations let you make changes to many episodes at once instead of editing them one by one. They are available on the Series Detail page.
Selecting Episodes
Use the checkboxes in the leftmost column of the episode table to select individual episodes. A Select All checkbox in the header selects every episode in that season.
When episodes are selected, the bulk action buttons update to show the count (e.g., "Delete Intros (5)" instead of "Delete All Intros").
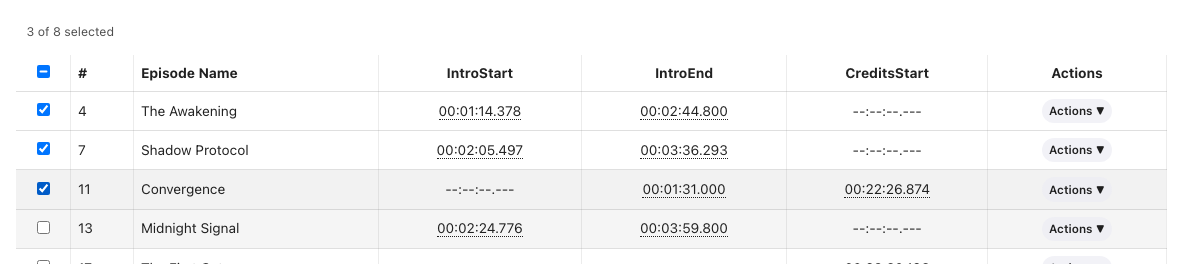
Three episodes selected - the selection counter updates in real time and bulk actions apply only to the checked rows.
- If no episodes are selected, bulk actions apply to the entire season.
- If some episodes are selected, bulk actions apply only to the selected episodes.
Copy Segments from a Source Episode
This feature copies marker values from one episode to others - useful when multiple episodes share the same intro or credits timing.
- Find the episode whose timestamps you want to copy.
- Click Actions on that episode's row.
- Hover over Copy to open the submenu, then choose what to copy:
- Intros - copies only Intro Start and Intro End
- Credits - copies only Credits Start
- Both - copies all markers
- A banner appears at the top confirming the source episode and the copy type (e.g., "Copying intros from Episode 3").
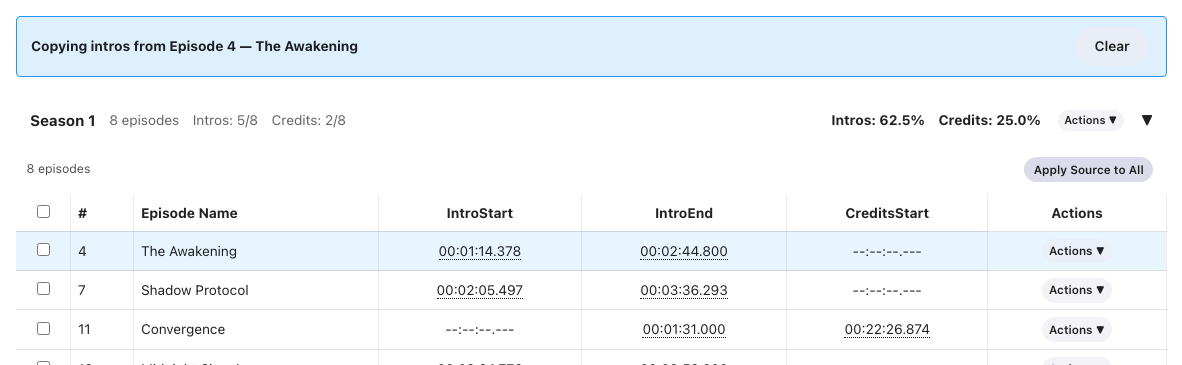
The copy banner shows the source episode and reveals the "Apply Source to All" button in each season's bulk action bar.
- Select the target episodes using checkboxes (or leave all unchecked to apply to the entire season).
- Click Apply Intros to Selected, Apply Credits to Selected, or Apply Source to Selected (the button label reflects the copy type).
Only the marker types you chose are copied to the targets. For example, if you choose Intros, only the Intro Start and Intro End values are applied - any existing credits markers on the target episodes are left unchanged. This is especially useful when a series has consistent intro timing across a season but varying credits positions.
Season-Level Actions Dropdown
Each season header has an Actions dropdown that provides bulk operations for the entire season (or selected episodes within it):
- Delete - submenu with Intros, Credits, or Both to remove markers from the selected episodes (or all episodes in the season). A confirmation prompt appears before any deletions are made.
- Set Credits to End - places the Credits Start marker at each episode's runtime endpoint. This is primarily useful for episodes that have no end credits, signaling that the item has been accounted for and preventing the EmbyCredits plugin from needlessly rescanning these items.
- Apply Source - only visible when a copy source is active (see Copy Segments above). Applies the copied markers to the season's episodes.
- Detect All - queues credits detection for all episodes in the season, overwriting any existing markers. Only visible when EmbyCredits is installed.
- Detect Missing - queues credits detection only for episodes that don't have credits yet. Only visible when EmbyCredits is installed.
Detection runs in the background. After it completes, run a sync (or wait for the nightly sync) to see the newly detected markers in Segment Reporting.
Tip: A detect button also appears at the series level in the page header.
Adjusting Timing in Bulk
You can apply the same timing shift to all selected items at once using the Adjust timing option in the season-level or query-page bulk action bar.
- Select the target episodes using checkboxes (or leave all unchecked to target the entire season on the Series Detail page).
- Click Adjust timing in the bulk action bar.
- Choose the shift direction and amount (250 ms per step) for each marker type in the modal - the same three rows as the per-row modal (Intro, Intro end, Credits). The dialog supports the same keyboard shortcuts as the per-row version (see Keyboard Shortcuts).
- Review the confirmation prompt showing how many items will be updated (up to 500 items per operation).
- Click Apply to commit the shift to all selected items.
A brief Undo prompt appears after the bulk apply. Click it to restore every item's previous values.
The relative shift is applied to each item independently using that item's current marker values. Items where a particular marker is absent are skipped for that marker type.
Bulk timing adjustment is available on the Series Detail page (season bulk bar), the Library page (movies), and the Custom Query results page (results bulk bar).
Custom Queries
The Custom Query page lets you search and analyze your segment data using a visual query builder or by writing SQL directly.
Built-in and Saved Queries
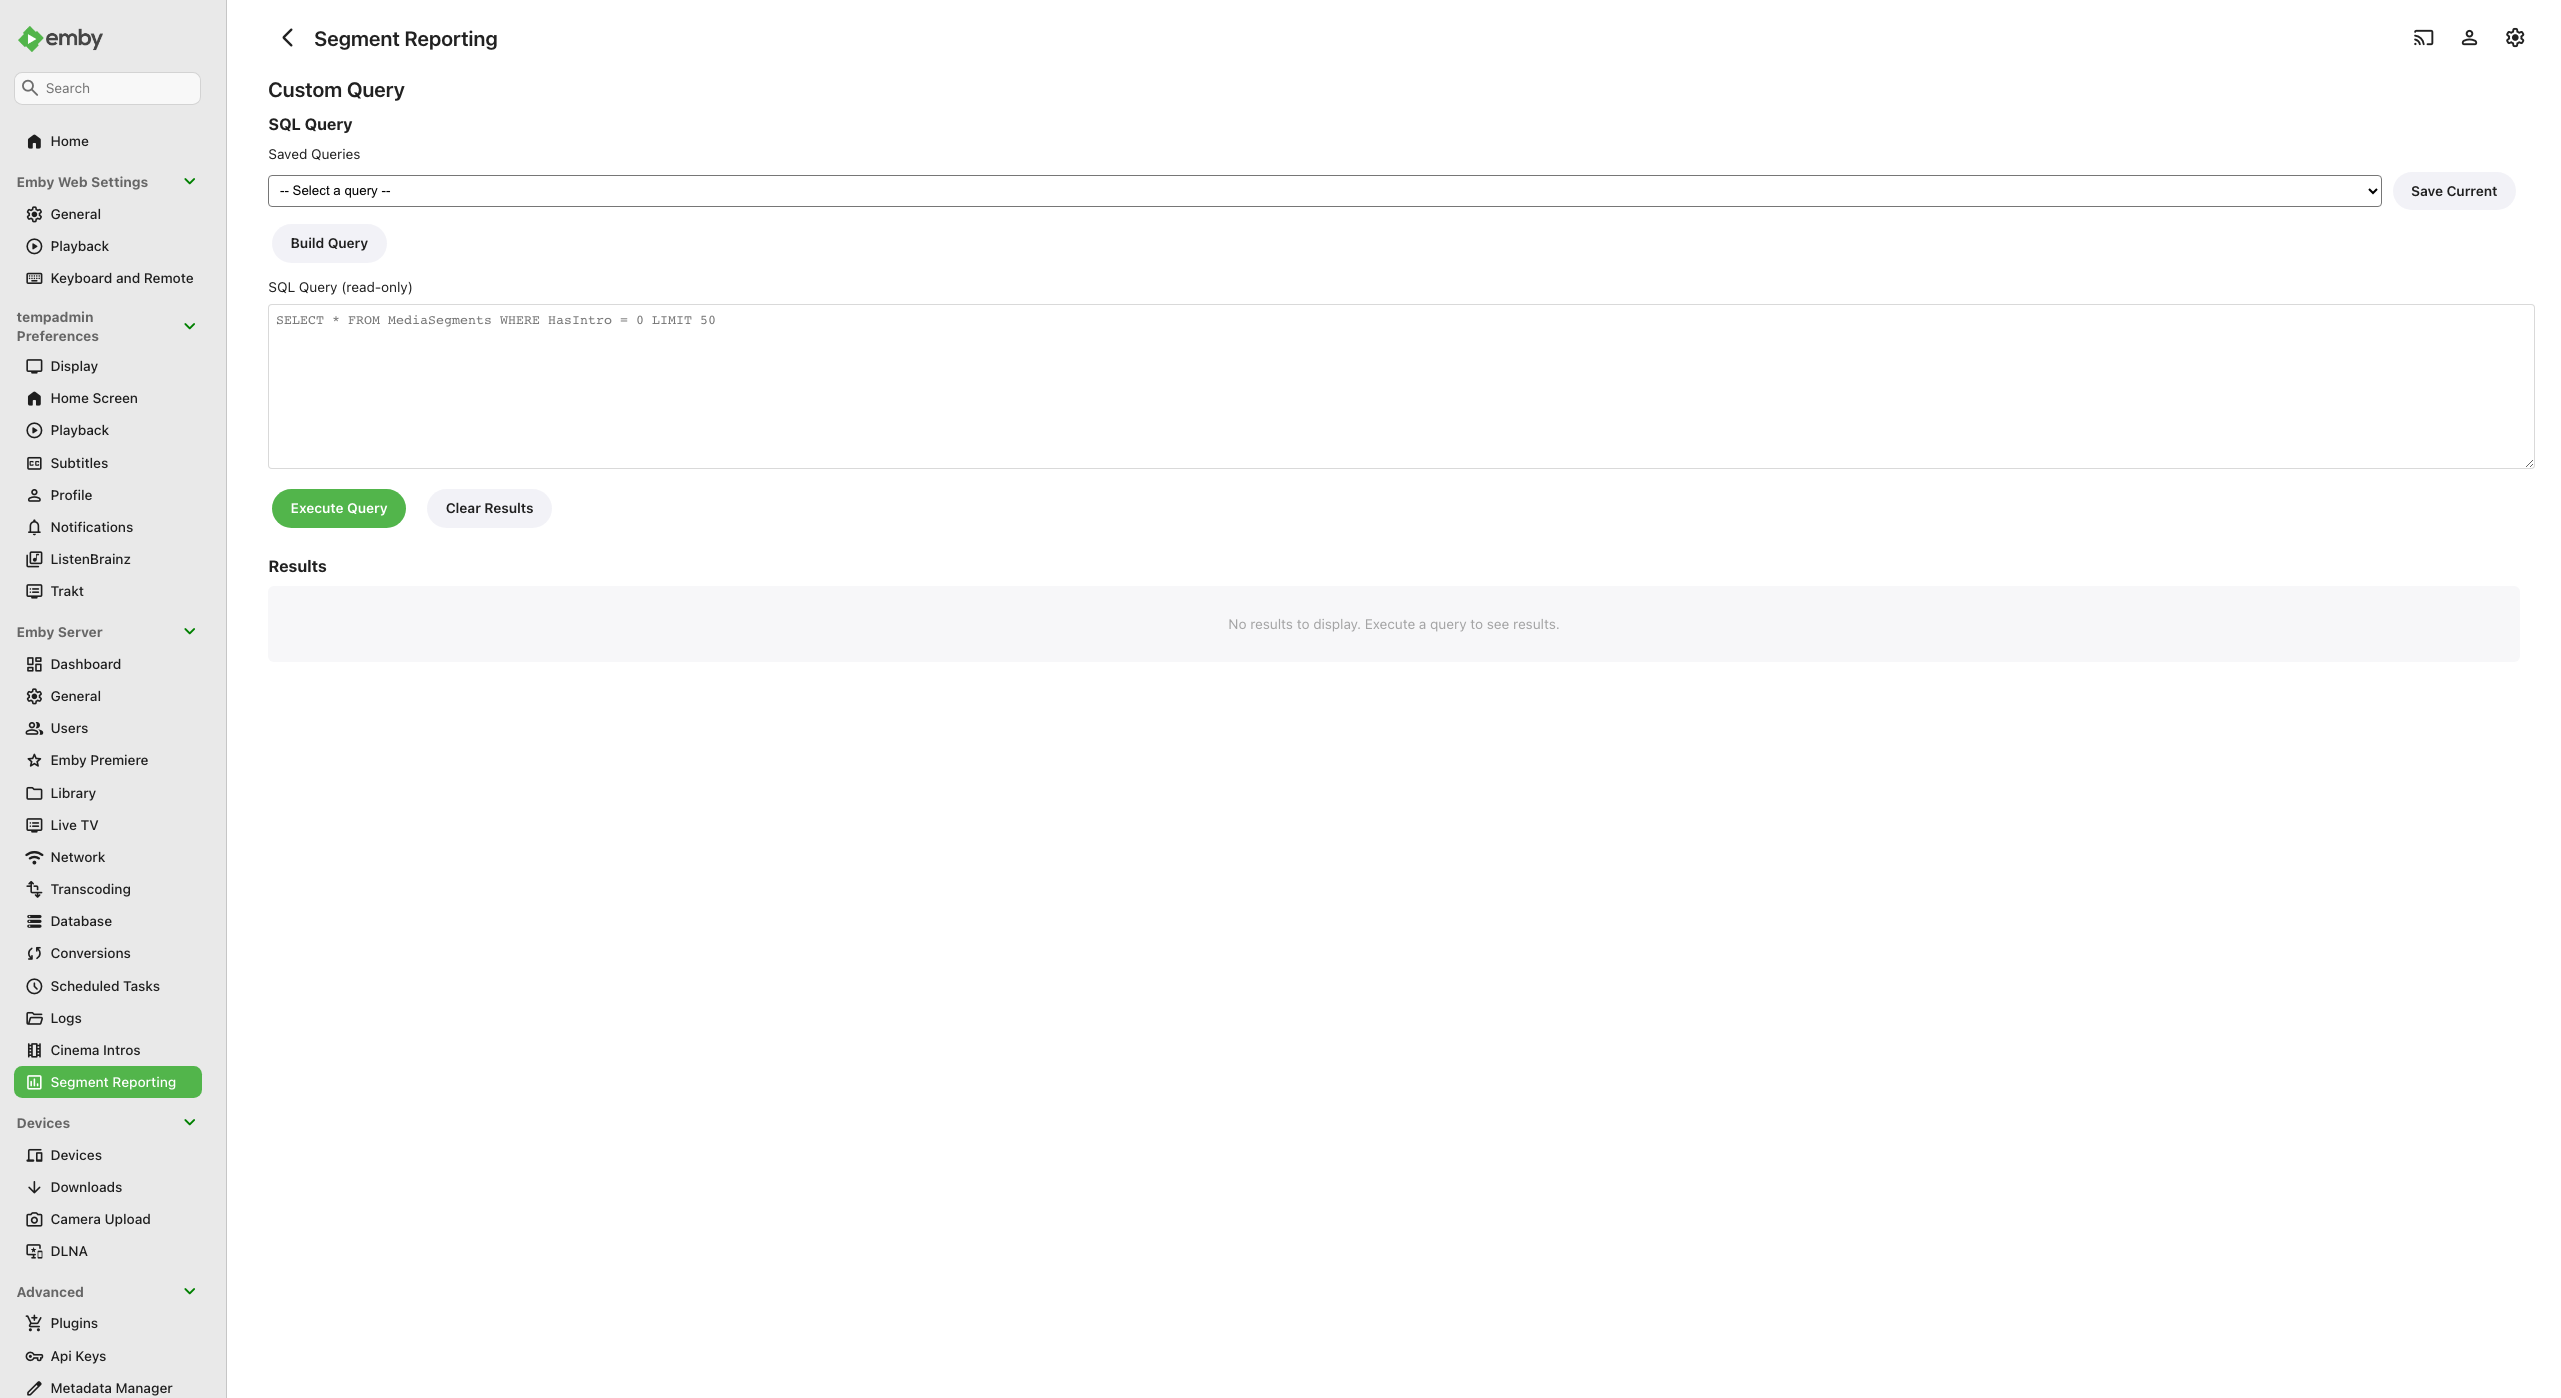
The Custom Query page showing the query dropdown with built-in templates and saved queries.
A dropdown at the top lists ready-to-use queries grouped into two sections:
Built-in queries:
| Query | What It Finds |
|---|---|
| All movies missing intros | Movies with no intro markers |
| All movies missing credits | Movies with no credits markers |
| All episodes missing intros | Episodes with no intro markers |
| All episodes missing credits | Episodes with no credits markers |
| Longest intros | Top 50 episodes/movies by intro duration |
| Coverage summary by library | Totals per library (items, intros, credits) |
Saved queries appear below the built-in ones. You can save your own queries for quick access later (see Saving Queries).
Select any query from the dropdown and click Run Query to execute it.
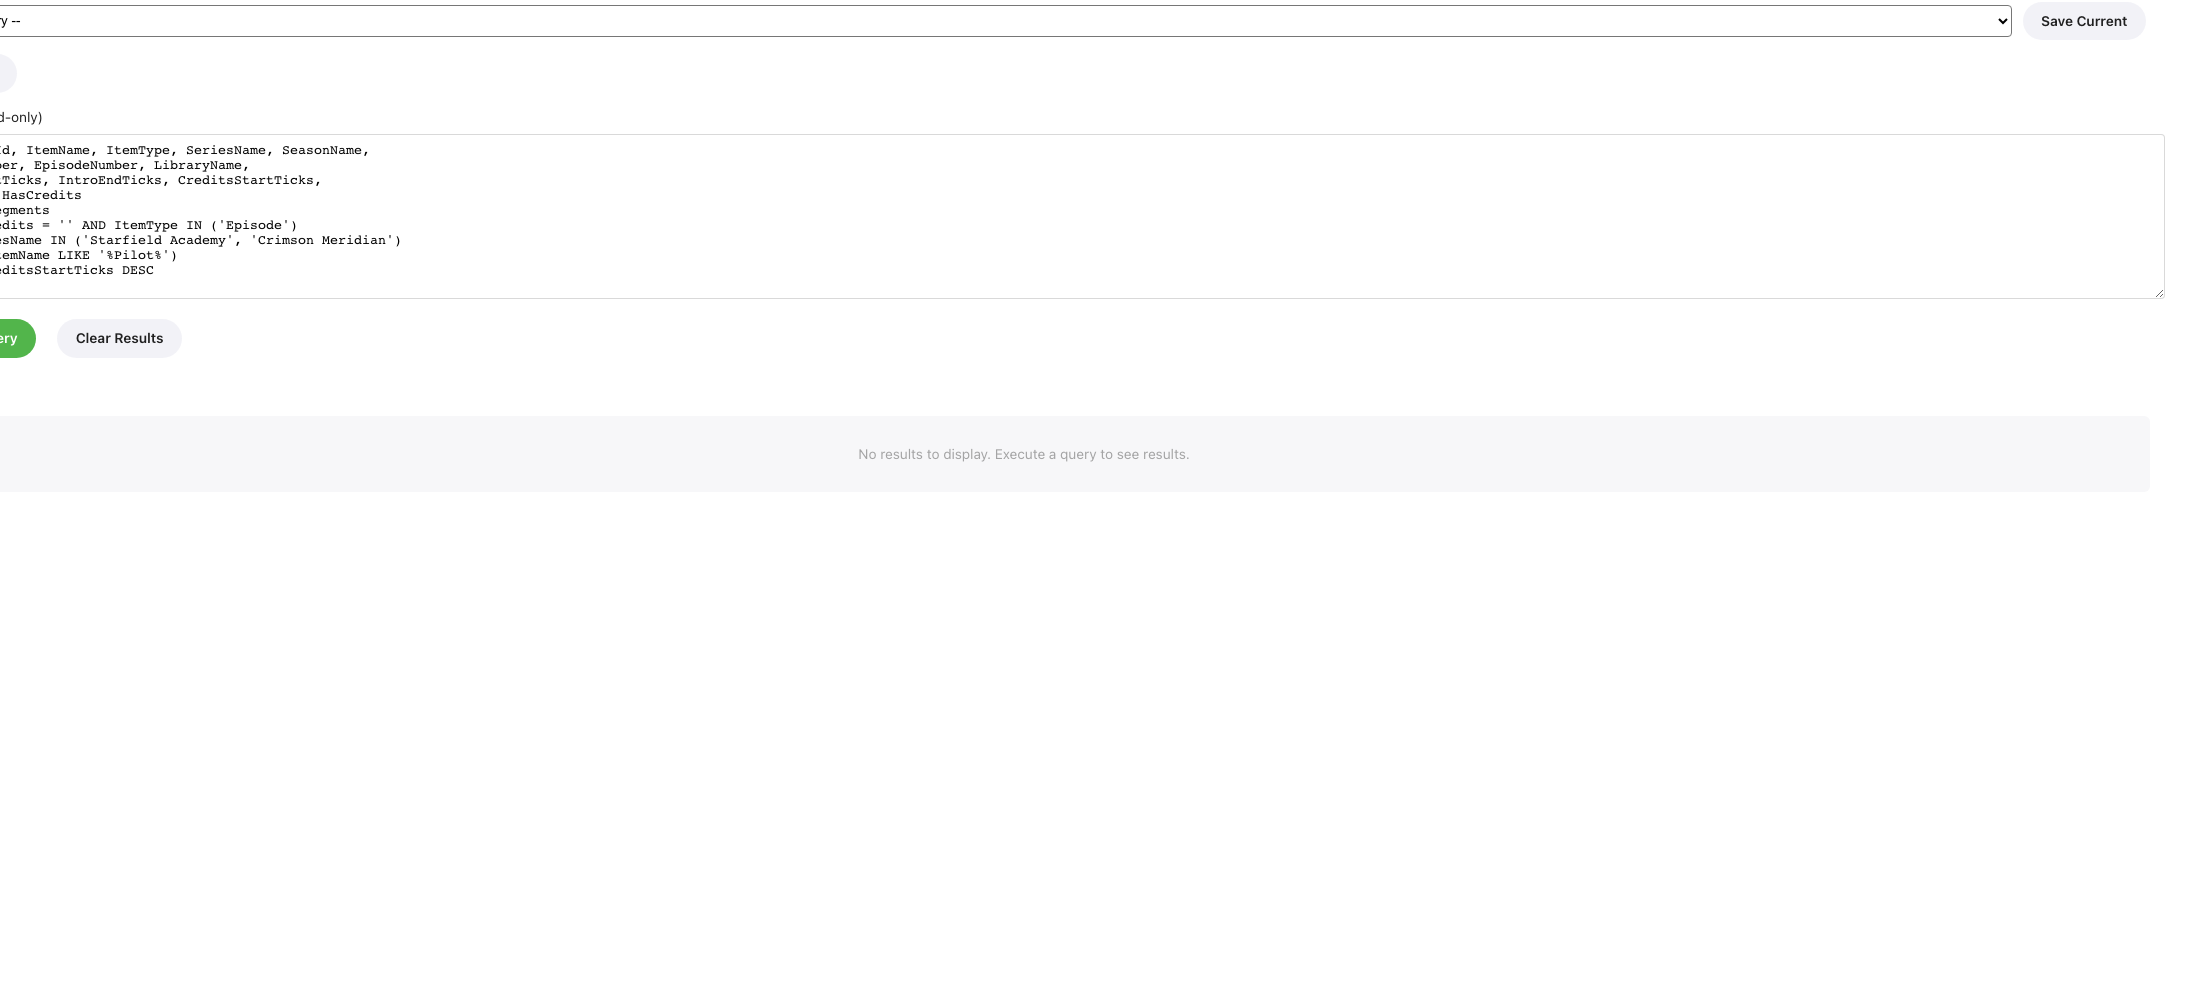
Visual Query Builder

The visual query builder with column pills, condition rows, and a live SQL preview.
The visual builder lets you construct queries without writing SQL:
- Click Query Builder to expand the builder panel.
- Columns - drag-to-reorder pills at the top control which columns appear
in results. Click the
xon a pill to remove it. - Conditions - each row has three parts: a field name, an operator, and a value. Click Add Condition to add more rows.
- AND / OR groups - click Add Group to create condition groups with OR logic (e.g., "Series Name is X OR Series Name is Y").
- ORDER BY - pick a column and choose ascending or descending.
- LIMIT - optionally cap the number of results.
- A live SQL preview at the bottom shows the query that will be executed.
- Click Run Query to execute.
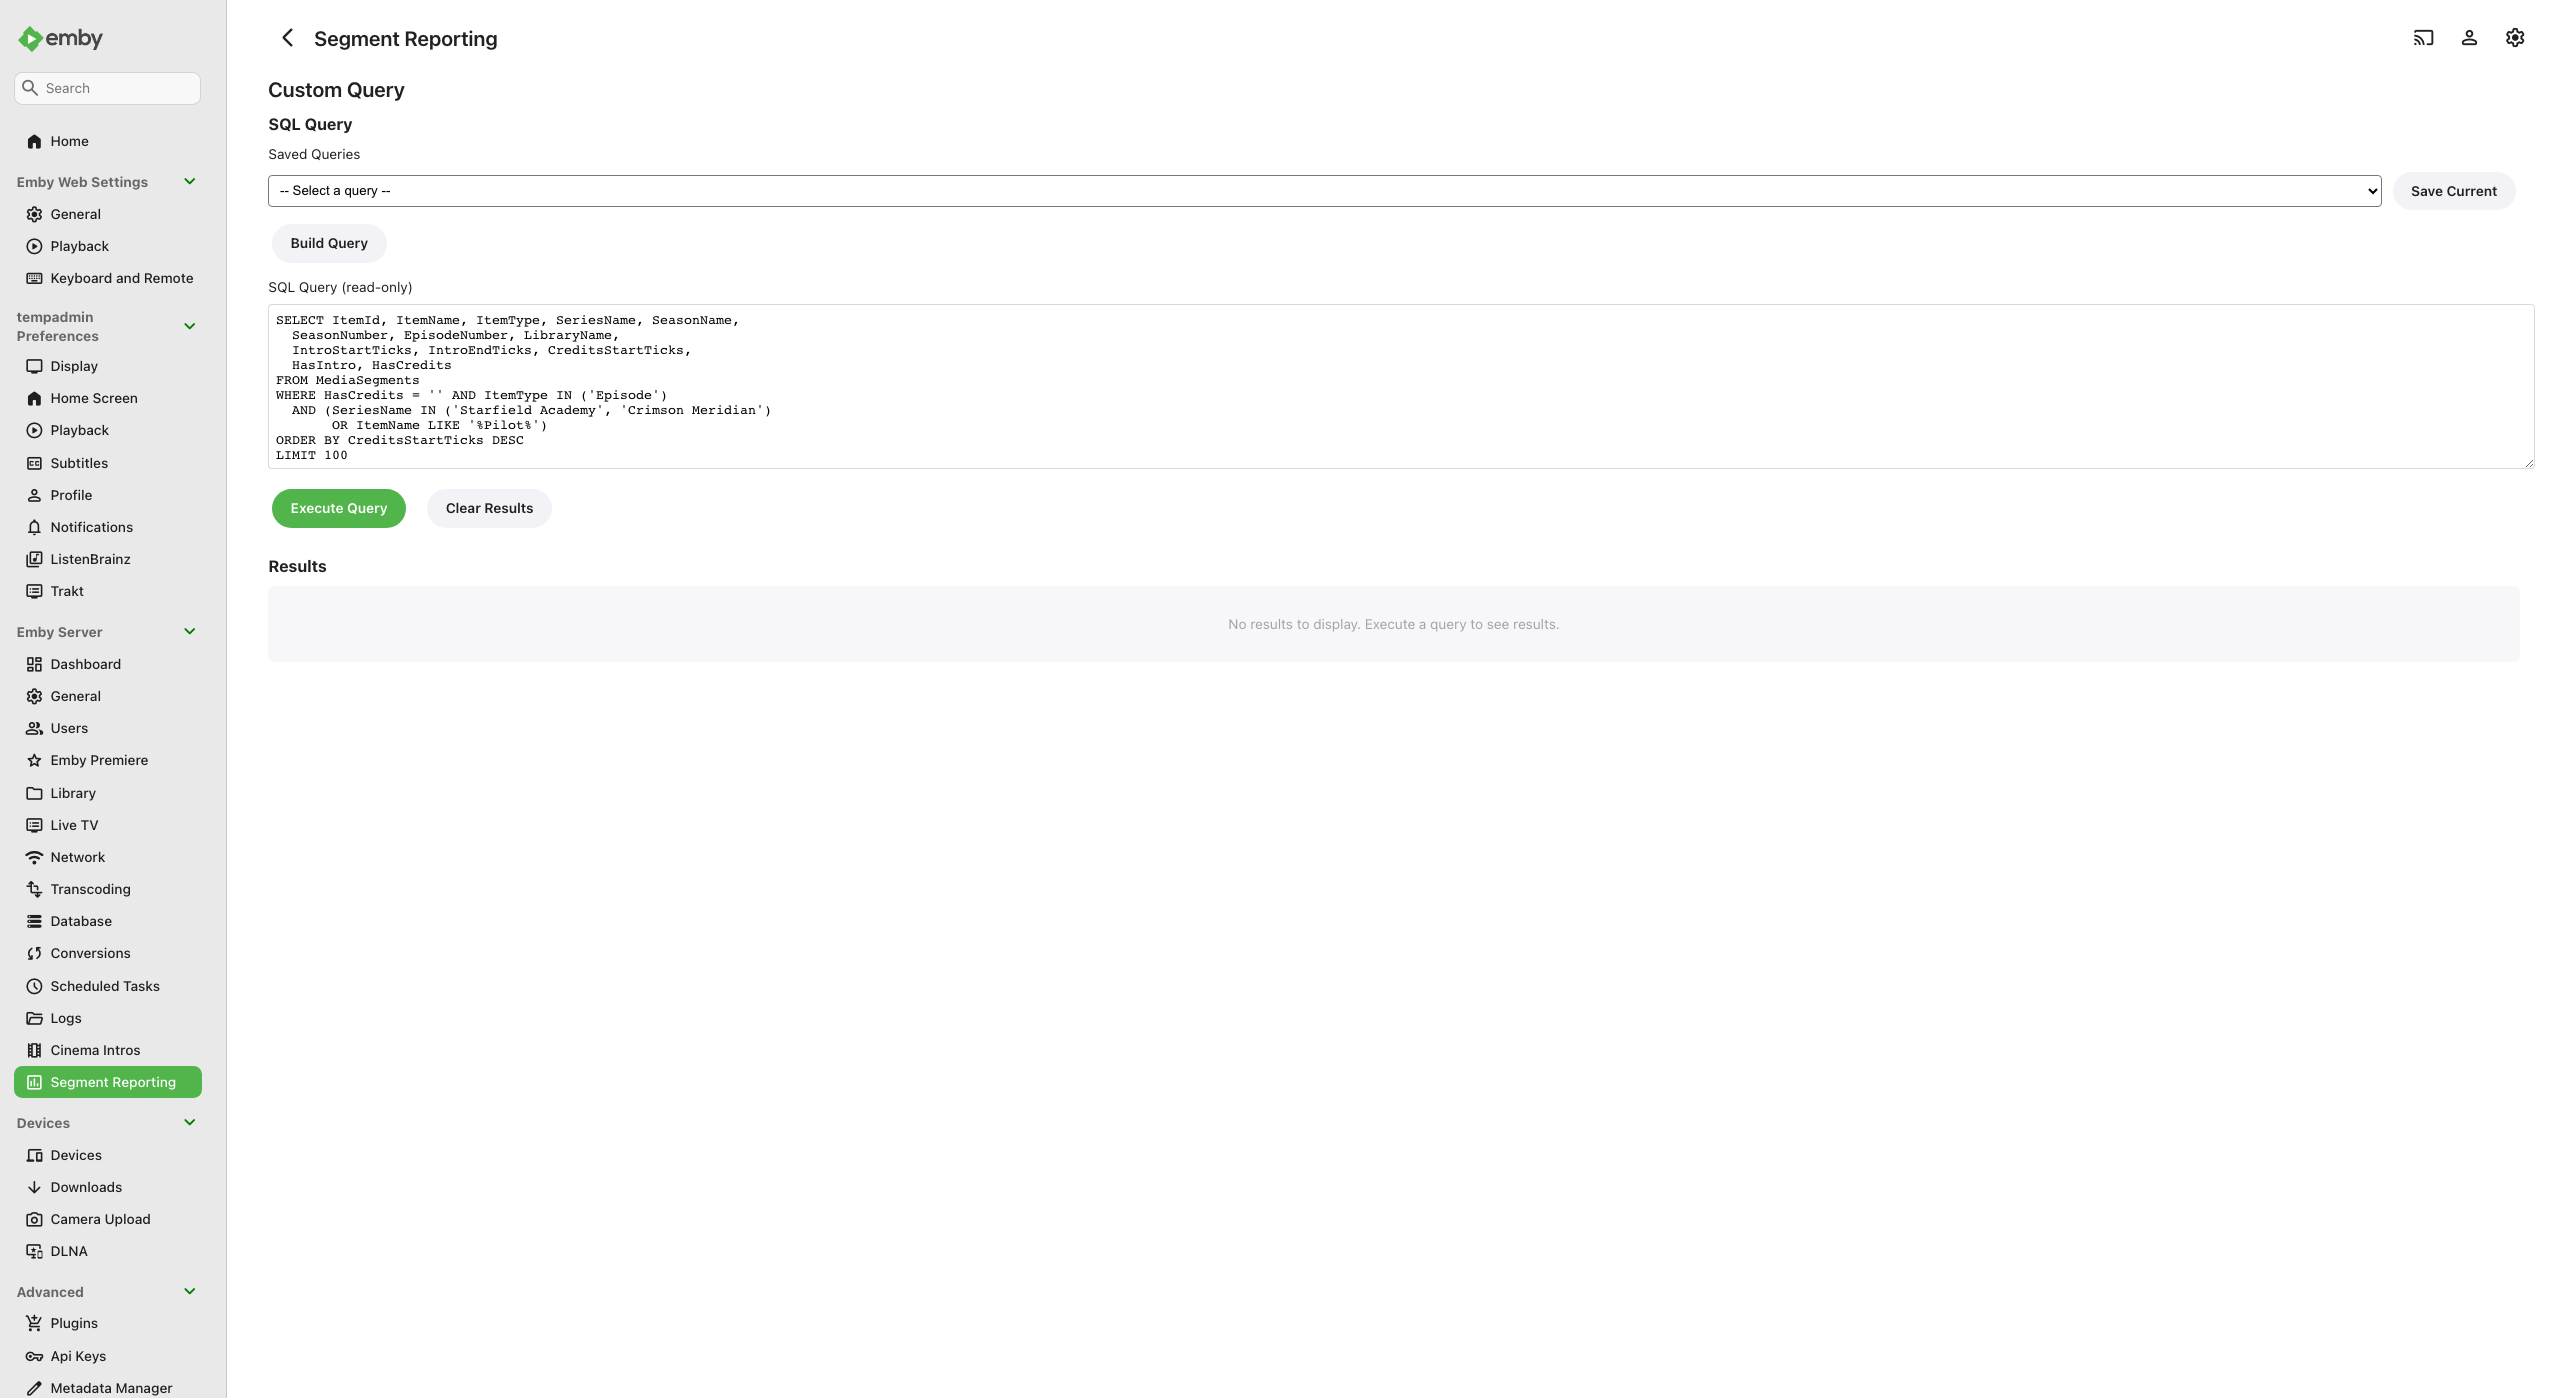
The builder area without the sidebar: condition rows, column pills, ORDER BY, and LIMIT.
The builder fully round-trips - if you load a saved query, the builder will populate itself from the SQL so you can modify it visually.
Autocomplete and Multi-Value Selection
Autocomplete suggestions from your library appearing as you type, with multi-value pill selection for "is any of" queries.
For fields like Series Name, Library Name, and Item Type, the query builder offers autocomplete suggestions pulled from your actual library data.
When you choose the is any of or is none of operators, you can select
multiple values. Each value appears as a small pill tag. This generates an
IN or NOT IN clause in SQL, so you can query across multiple series or
libraries in a single condition.
Query Results
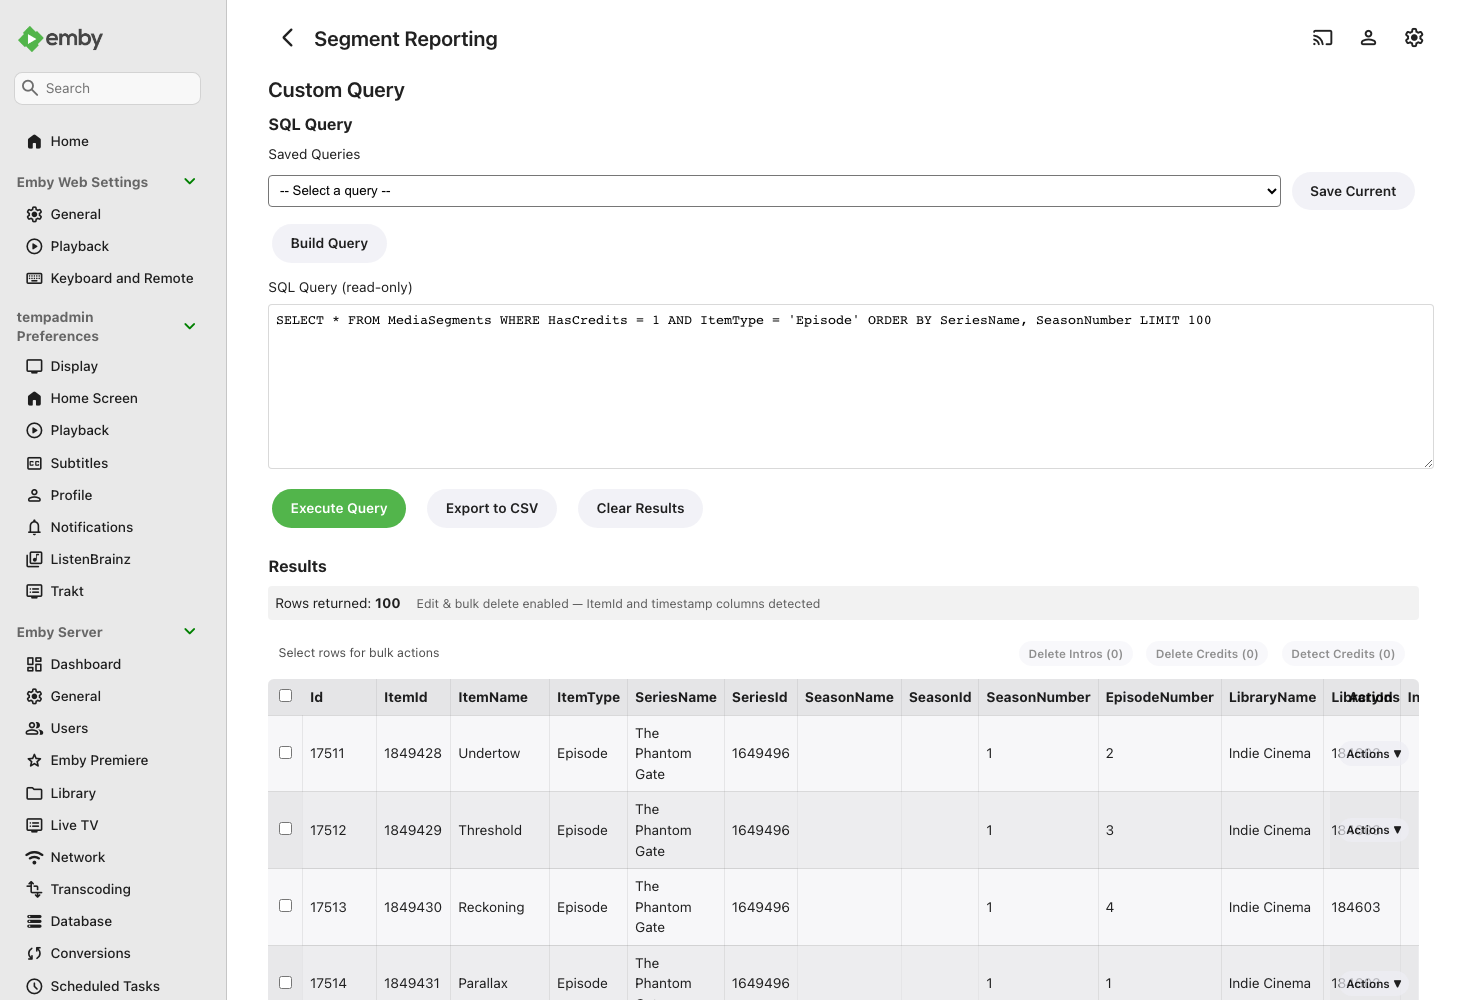
Query results with checkboxes, per-row Actions menu, and bulk action buttons.
After running a query, results appear in a table below. The results table supports:
- Row checkboxes - select rows for bulk operations
- Per-row Actions menu - when the query includes an
ItemIdcolumn, each row shows an Actions button with options for Edit, Adjust timing, Delete (with Intros / Credits / Both submenu), Set Credits to End, and Detect Credits - Inline editing - if the results include segment timestamp columns, you can edit values directly in the results table
- Bulk actions - delete or set credits to end for selected rows
- Playback links - timestamp values are clickable links that start playback at that position
- Timestamp formatting - tick values are automatically displayed in the
human-readable
HH:MM:SS.fffformat
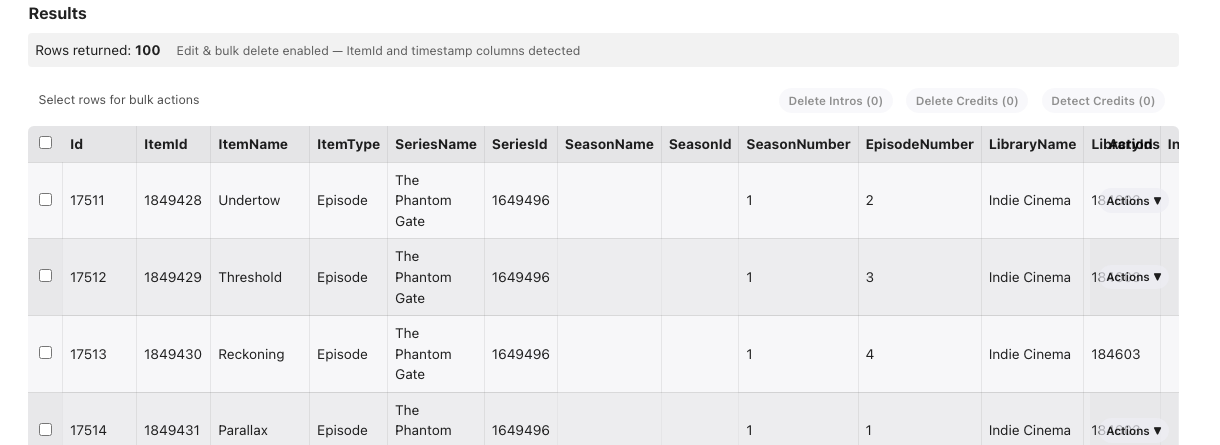
The results table with bulk action buttons and a per-row Actions menu.
CSV Export
Click the Export CSV button above the results table to download the query
results as a .csv file. The export includes all columns and rows from the
current result set. This is handy for offline analysis, sharing data with
others, or keeping records.
Saving Queries
To save a query for later:
- Write or build your query.
- Type a name in the Query Name field.
- Click Save Query.
Your saved query will appear in the dropdown alongside the built-in queries. To update an existing saved query, load it, make changes, and save again. To delete a saved query, load it and click Delete.
Settings
The Settings page controls how the plugin looks and behaves.
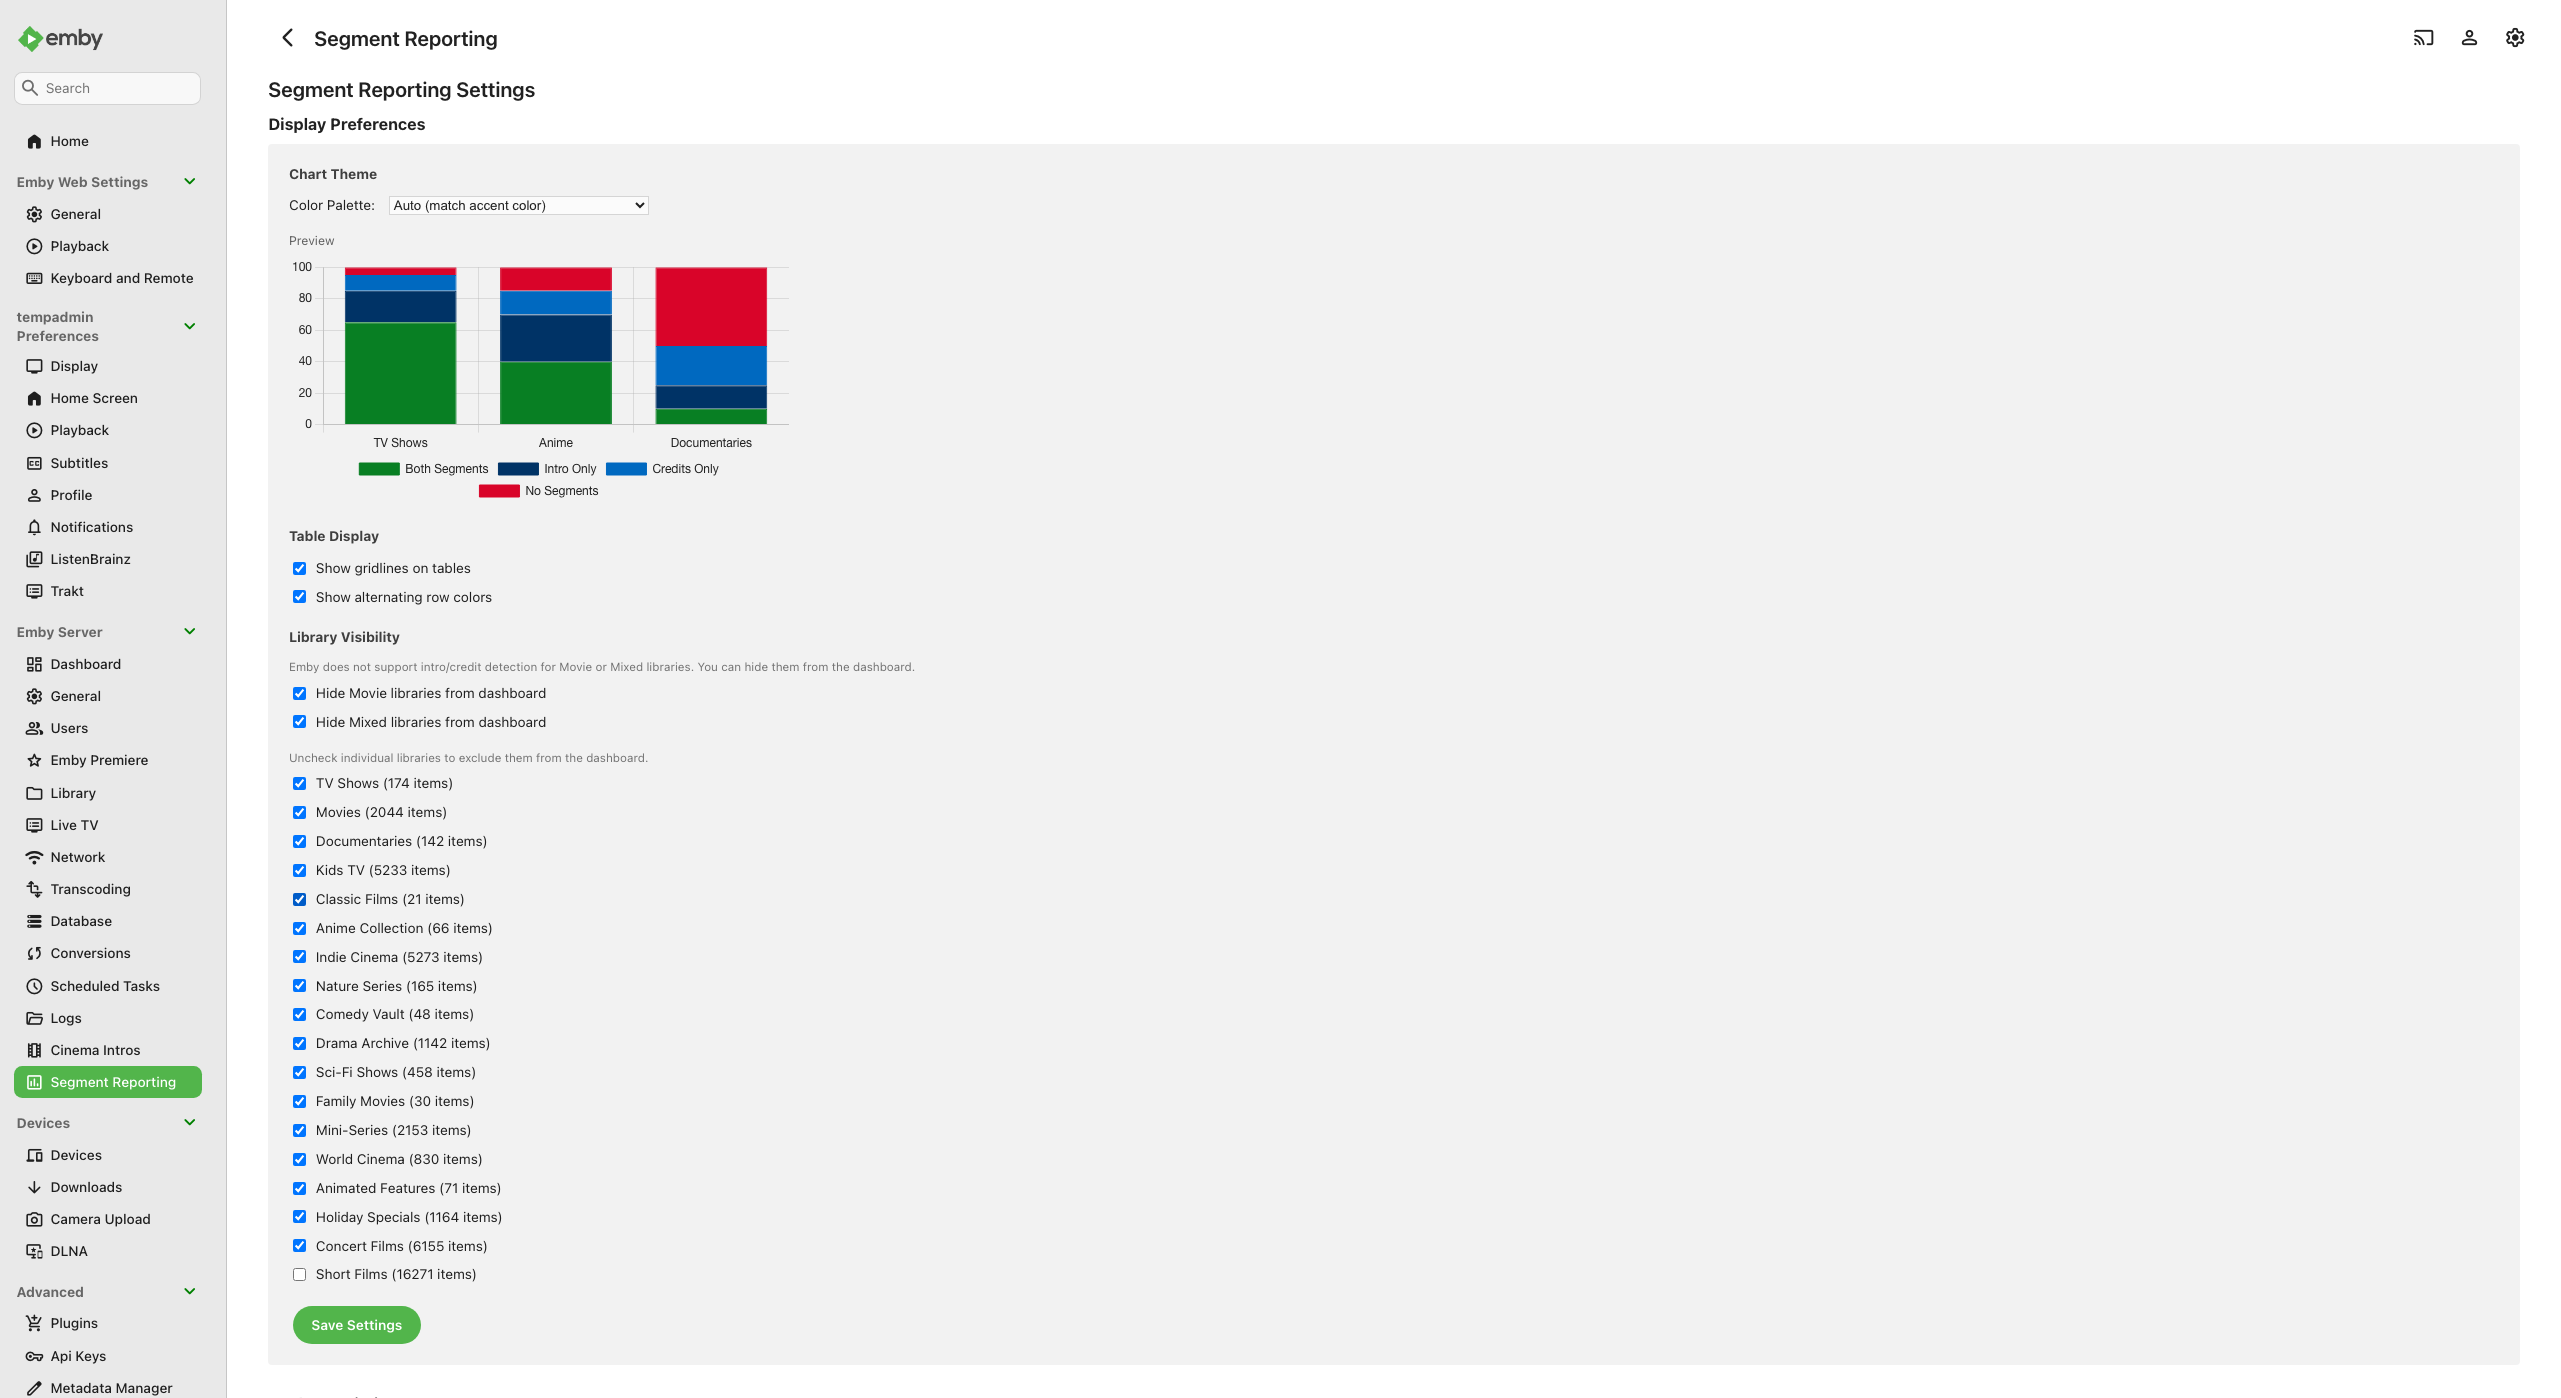
Settings page with chart palette selection, live preview, table display options, and cache management.
Chart Color Palettes
Choose a color palette for all charts across the plugin. The five named palettes are theme-aware: each one uses different shades automatically when your Emby theme is light versus dark, so charts stay readable in both modes. Options include:
| Palette | Description |
|---|---|
| Auto (match accent color) | Generates colors based on your Emby theme's accent color |
| Green (Default) | Green-based palette (theme-aware light/dark shades) |
| Blue | Blue-based palette (theme-aware light/dark shades) |
| Red | Red-based palette (theme-aware light/dark shades) |
| Pink | Pink-based palette (theme-aware light/dark shades) |
| Purple | Purple-based palette (theme-aware light/dark shades) |
| Custom Colors | Pick your own colors for each segment category |
When you choose Custom Colors, four color pickers appear so you can set exact colors for:
- Both Segments
- Intro Only
- Credits Only
- No Segments
A live preview chart updates immediately as you change palettes or colors, so you can see exactly how your charts will look before saving.
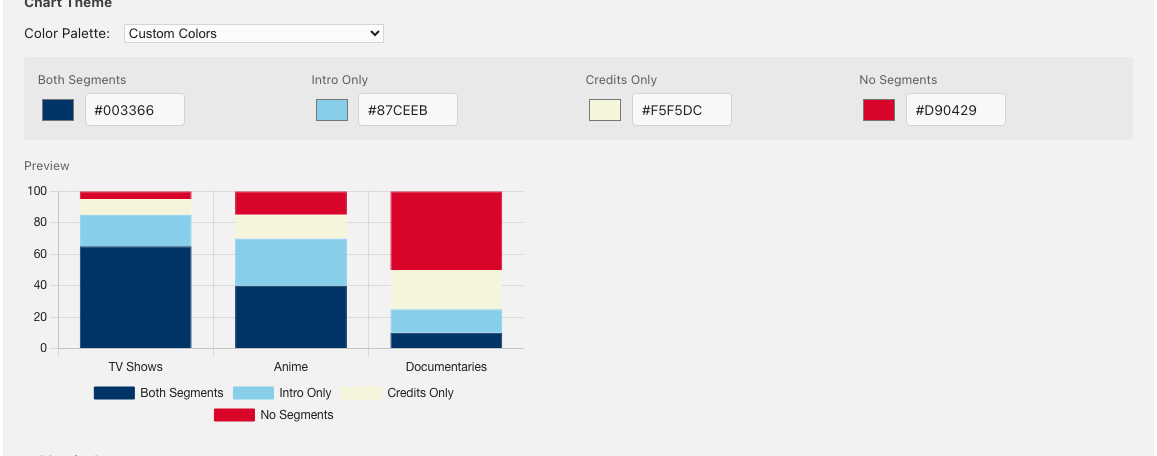
The Custom Colors panel with four color pickers and the live preview chart showing how the selected colors render across library categories.
Table Display Options
Two toggles control the appearance of data tables throughout the plugin:
- Gridlines - adds borders between table cells for easier reading
- Alternating row colors - adds subtle background striping to every other row
Library Visibility
Checkboxes let you hide specific library types from the Dashboard:
- Hide movie libraries - removes movie-only libraries from the dashboard chart and table
- Hide mixed libraries - removes libraries that contain both TV shows and movies
Hidden libraries are only removed from the Dashboard view. You can still access them through direct navigation or custom queries.
Tip: This is useful if you have movie libraries where intro/credits detection is not relevant and you want a cleaner dashboard view.
Cache Management
The bottom of the Settings page shows cache statistics and maintenance tools:
| Stat | What It Shows |
|---|---|
| Rows | Number of items in the cache |
| Database size | Size of the cache file on disk |
| Last sync | When the cache was last updated |
| Sync duration | How long the last sync took |
Two maintenance buttons:
- Vacuum - compacts the database file to reclaim disk space. Safe to run at any time.
- Force Full Rescan - drops the entire cache and rebuilds it from scratch. The plugin will show no data until the rebuild completes. Use this if you suspect the cache is out of sync.
Maintenance
Scheduled Tasks
The plugin registers two tasks in Emby's Scheduled Tasks system (Settings > Scheduled Tasks > Segment Reporting):
| Task | Default Schedule | What It Does |
|---|---|---|
| Sync Segment Data | Daily at 2:00 AM | Scans all libraries and updates the cache with current segment data |
| Clean Segment DB | Weekly, Sunday at 3:00 AM | Compacts the database and checks cache health |
You can change the schedule for either task from Emby's Scheduled Tasks page. For example, if you frequently add new media and want the cache updated more often, you could set the sync task to run every 12 hours.
Manual Sync
You can trigger a sync at any time without waiting for the schedule:
- From the Dashboard: Click the Sync Now button.
- From Emby: Go to Settings > Scheduled Tasks > Segment Reporting and click Run next to "Sync Segment Data."
The sync runs in the background. You can continue using the plugin while it runs - the data will update when the sync completes.
Force Rescan
If the cache seems out of date or you are seeing stale data, a Force Full Rescan rebuilds everything from scratch:
- Go to the Settings page in the plugin.
- Click Force Full Rescan.
- Confirm the action.
The cache is emptied and a fresh sync is queued. The plugin will show empty results until the sync completes.
Warning: While the rescan is running, the plugin's Dashboard, Library, and Series views will be empty. This is normal - the data returns once the sync finishes.
Vacuum
Over time, as segments are added and removed, the database file may grow larger than necessary. The weekly Clean task handles this automatically, but you can also run it manually from the Settings page by clicking Vacuum.
Vacuuming compacts the file and has no effect on your data. It is always safe to run.
Troubleshooting
The Dashboard shows no data
- Make sure you have run the initial sync (see Running the First Sync).
- Check Emby's Scheduled Tasks page to see if the Sync task is currently running. Wait for it to complete.
- If a Force Rescan was recently triggered, the cache may still be rebuilding.
Segment edits are not reflected in Emby's player
- Edits made through the plugin are saved to Emby immediately. Try refreshing the player or restarting playback.
- If the issue persists, check that the item still exists in your library (it may have been removed or re-scanned by Emby).
The "Detect Credits" buttons are not visible
- These buttons only appear when the EmbyCredits plugin is installed and running on the same Emby server. Install EmbyCredits separately if you want automatic credits detection.
Charts or tables look broken after an update
- Clear your browser cache (Ctrl+Shift+Delete in most browsers) and reload the page. Plugin updates may include new styles that require a cache refresh.
Accessibility
The plugin's admin pages target WCAG 2.1 Level AA and are built to work with screen readers and keyboard-only navigation.
- Landmarks - each page exposes a main content landmark, and the Library and Series pages mark their breadcrumb trail as a navigation landmark, so you can jump straight to the content with your screen reader's landmark shortcuts.
- Charts - every coverage chart is announced as an image with a short summary, and the same data is provided as a hidden data table that screen readers can read row by row. Decorative previews (such as the color palette sample in Settings) are labeled as illustrative only.
- Tables - column headers are announced for each cell. Sortable headers (on the Library page) are reachable with Tab and can be activated with Enter or Space; the current sort direction is announced.
- Filtering and searching - after you change a filter, run a search, sort a table, or run a custom query, the number of matching results (or the action taken) is announced via a live region.
- Custom Query widgets - the value pickers in the visual query builder use the standard combobox/listbox pattern. Multi-value "chips" can be removed with the keyboard (focus the remove control and press Enter or Space).
- Color contrast - if a custom chart palette is hard to read, the Settings page lets you pick higher-contrast colors (see Chart Color Palettes).
Manual screen-reader verification (NVDA on Windows, VoiceOver on macOS) is ongoing; please report any accessibility issues via the issue tracker.
Getting Help
- Emby Forums - post questions or feedback in the Segment Reporting discussion thread
- GitHub Issues - report bugs or request features at the issue tracker
- Developer Guide - for technical details on the plugin's architecture, data model, and API, see the Developer Guide